- BOAT OF THE YEAR
- Newsletters
- Sailboat Reviews
- Boating Safety
- Sails and Rigging
- Maintenance
- Sailing Totem
- Sailor & Galley
- Living Aboard
- Destinations
- Gear & Electronics
- Charter Resources
- Ultimate Boating Giveaway

How to Strip Your Bottom Paint
- By Jen Brett
- Updated: May 14, 2013

Stripping Paint
For many, slapping on a new coat of bottom paint is a time-honored springtime ritual. That step, however, is merely the last task at the end of a long road. If you’re the owner of an older sailboat, you may be dealing with years of various bottom coatings, aging barrier coats, and possibly blisters, which all must be dealt with before you apply a new coat of antifouling.
If your boat’s bottom has reached the point where years, or perhaps even decades of paint buildup has started to make it look like a topographical map, you should consider taking all of the coatings off and starting over.
If doing some hard time on the hard is in your future, here are some steps to take that will renew your boat’s bottom and make your sailing that much sweeter. For a bottom that’s in decent condition, “sand lightly with 60- or 80-grit sandpaper and wipe off the sanding residue,” says Jim Seidel, the marketing manager for Interlux Paint. “When sanding, feather out the edges of any areas that may have been scratched or damaged. Once the bottom has been sanded and cleaned, go ahead and apply the new antifouling paint, first making sure that the new paint is compatible with the old. Most modern paints are compatible with one another, but there are still some that can cause problems.”
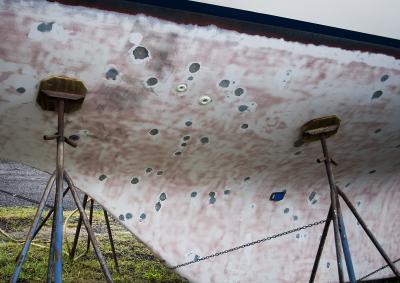
If you notice any old bottom paint that’s flaking, you’ll need to take a scraper and chip the loose bits off, then feather out from the area with a sander until you reach paint that’s adhering well. This is best if you encounter only a few relatively small areas of flaking paint. If much of the bottom is this way, you’ll probably want to remove all the existing paint down to the barrier coat, or possibly to the gelcoat. “We recommend stripping bottoms when there’s clearly excessive buildup and the bottom starts flaking in areas that’ll expand every year,” says Scott Murray, the yard manager at New England Boatworks in Portsmouth, Rhode Island. “Once that happens, you can sand and try to feather out the edges of the flaking areas, but when paint is applied, the solvents in the paint will attack those edges and can make the problem worse.”
“No matter how well the surface was prepared, there’s only a certain amount of paint that’ll adhere to it,” Seidel says. “As the boat is launched and hauled, the paint will absorb water and then release it, causing the paint to swell and contract. This buildup, as well as the absorbing and drying out of the paint, causes the oldest coats to get weaker, and they may start to crack or detach from the surface. When this happens, it’s time to start over.”
If you need to take off many paint layers, there are several ways to do this, and what you ultimately decide on will depend on your boat’s current condition, your budget, and the boatyard’s rules.
Sanding the boat’s bottom is the dreaded chore that most boat owners will face at some point. This is definitely a case in which having the right tools will really make your job easier. Using a vacuum sander helps keep most of the dust out of the air, producing a much cleaner work environment. Many boatyards also require them. Prices for a random orbital sander with a vacuum port range from about $60 for a Ridgid brand to about $450 for a top-of-the-line Festool. You’ll also need to buy a Shop-Vac-style vacuum.
You’ll want to sand down the bottom with 60- or 80-grit paper until the excess paint is removed and the bottom isn’t overly textured. Be careful not to damage the gelcoat. Most boatyards in the United States have strict rules about how bottom jobs are done and may require a ground cover or a tent around the boat from the waterline down to capture the dust and debris.
A quicker way to remove many layers of paint is through high-pressure blasting with either soda, sand, or a special glass material shot at the hull. It’s effective and faster than sanding, but it’s also not typically a do-it-yourself project. If having your hull blasted is something that you’re considering, do your homework and find a reputable blaster. Also check to see if your boatyard allows it. Expect to pay about $35 to $45 per foot for professional blasting.
Soda blasting is what many boat owners choose for bottom-coating removal on fiberglass boats because it’s less abrasive than other materials, though if you have a steel or aluminum hull, you can probably go with sand blasting. If the project is done by a skilled blaster, the soda will take off coatings down to the gelcoat or barrier coat—if it’s in good condition—without damage.
After soda blasting, the surface is typically too smooth for bottom paint and must then be sanded with 60- or 80-grit sandpaper. Before covering with new antifouling paint, wash the bottom with water and let it thoroughly dry. According to Mike Morgan from Chesapeake Blasting Service, “Most boats can be blasted unless they have serious issues with the gelcoat or fiberglass. If this is the case, they should be peeled and a whole new bottom applied.” (See “ Banishing Bottom Blisters ,” April 2012.)
A chemical paint stripper is another way to remove paint buildup and is the method of choice for some boatyards since there’s no dust or noise and the residue can easily be contained. Paint stripper is relatively easy to use—you brush it on with a paintbrush, wait the recommended time, then remove the resulting goo with a scraper—but it can be a time-consuming process, not to mention a messy one. A ground cover is essential, and you’ll need to discuss the debris disposal with your boatyard.
When choosing a chemical paint stripper, be sure to check that it can be used on your particular hull material, and expect to use 5 to 6 gallons for a 45-foot sailboat. Paint strippers work best when not used under direct sunlight, as the chemicals need to stay moist to work. After the old antifouling paint is removed, you’ll still need to sand the bottom with 60- or 80-grit sandpaper to rough up the bottom for paint.
Jen Brett is Cruising World ‘s associate editor.
Barrier Coat Q&A with Don Zabransky, Pettit Paints
What’s a barrier coat? A barrier-coat system is a heavy-duty, two-component epoxy coating for use where maximum resistance to fresh or salt water is required. It reduces water absorption in fiberglass hulls, making it an excellent choice for the prevention and repair of osmotic blisters.
Who needs one? People who want to protect their investments and those performing blister repairs on a hull. It’s also recommended that hulls stripped by methods such as soda blasting receive a barrier coat to provide a new protective skin to the bottom of the boat.
How long do they last? A 12-mils thickness of a properly applied, high-quality barrier-coat system should result in 10 or more years of blister protection.
How do you apply one? • Thoroughly prep the hull as per the manufacturer’s instructions. Don’t mix more material than can be used within the specified pot life shown on the label. • Apply the recommended number of coats of the epoxy barrier-coat system. A wet film thickness of our Pettit-Protect should be 7 mils per coat, which yields a 4-mils dry-film thickness. A wet-film thickness gauge should be used to monitor paint application. Total dry-film thickness for a three-coat application should be 12 mils minimum for maximum coating performance. • Always follow recoating windows set out by the manufacturer. These windows will be relative to the temperature of the hull and its surroundings. Typical windows between coats will be from two to six hours on the short side to 14 days on the long side. Missing these windows requires sanding between coats. • Apply the first coat of antifouling paint over the last coat of epoxy within the specified over-coating schedule set by the manufacturer. These times are also temperature related. This is known as “hot coating” because the paint is applied and a bond formed before the epoxy is fully cured.
- More: boat maintenance , How To , maintenance
- More How To

Grease the Wheels of Your Boat: A Guide to Proper Lubrication

A Bowsprit Reborn: A DIY Renovation Story

Rigging Redo: Our Switch to Synthetic

Top Tools for Sailboat Cruising: Must-Have Gear for 2024

Galápagos: A Paradise Worth the Paperwork

Around Alone

- Digital Edition
- Customer Service
- Privacy Policy
- Terms of Use
- Email Newsletters
- Cruising World
- Sailing World
- Salt Water Sportsman
- Sport Fishing
- Wakeboarding
How to Remove Bottom Paint from a Boat
Maintaining the appearance and performance of your boat requires periodic maintenance, and one crucial task is removing old bottom paint. Over time, the layers of paint beneath the waterline can deteriorate, leading to reduced speed, decreased fuel efficiency, and potential damage to the hull. To ensure your boat stays in optimal condition, it’s essential to know how to effectively remove bottom paint.
Removing bottom paint involves careful assessment, the right tools, and the appropriate techniques. In this comprehensive guide, we will walk you through the step-by-step process of safely and efficiently removing bottom paint from your boat. Whether you’re a seasoned boat owner or a beginner, this guide will provide you with practical tips, expert advice, and valuable insights to tackle the task successfully.
We will explore various methods for bottom paint removal, such as mechanical techniques like sanding and scrubbing, as well as chemical-based options. Additionally, we’ll discuss alternative removal methods and guide you through the process of evaluating the hull, repairing any damage, and selecting a new bottom paint for your boat.
By following the guidelines outlined in this guide, you’ll be equipped with the knowledge and tools to restore your boat’s hull to its original glory and ensure optimum performance on the water. Let’s dive in and learn how to remove bottom paint from a boat the right way.

Assessing the Bottom Paint
Before diving into the process of removing bottom paint, it’s crucial to assess its condition and understand the scope of the project. The condition of the existing paint can influence the choice of removal method and the amount of effort required. Here’s how to evaluate the bottom paint on your boat:
- Inspecting the Condition: Start by closely examining the paint’s surface for any signs of cracking, peeling, or blistering. Note areas where the paint is still intact and areas where it has worn away.
- Identifying the Type of Bottom Paint: Different types of bottom paint have varying compositions and characteristics. Determine whether the existing paint is ablative, hard, or a hybrid. This information will help you choose the most suitable removal method.
- Checking for Underlying Damage: While assessing the bottom paint, keep an eye out for any underlying issues such as osmosis, cracks, or other damage to the hull. Identifying these problems early on will allow you to address them during the removal process.
Gathering the Necessary Tools and Materials
To effectively remove bottom paint from your boat, you’ll need the right tools and materials. Here’s a list of essential items to have on hand:
| Tools | Materials |
|---|---|
| Sanding machine or sandpaper | Protective gloves |
| Scrapers and putty knives | Safety goggles |
| Brushes (stiff and soft) | Respirator mask |
| Power washer (optional) | Chemical paint stripper |
| Heat gun (optional) | Drop cloths or plastic sheeting |
| Vacuum or shop vac | Paint disposal containers |
| Safety glasses | Cleaning solvents |
Gathering these tools and materials in advance will streamline the bottom paint removal process and ensure your safety throughout the project.
Preparing the Work Area
Before you begin removing the bottom paint, it’s important to prepare the work area properly. Taking the following steps will help you maintain a clean and organized workspace:
- Choosing a Suitable Location: Select a well-ventilated area for the bottom paint removal, preferably outdoors. If working indoors, ensure there is adequate ventilation to prevent the buildup of fumes.
- Setting up Ventilation and Containment: If you’re using chemical paint strippers or other potentially hazardous substances, set up proper ventilation using fans or open windows. Additionally, create a containment area using drop cloths or plastic sheeting to prevent paint chips, dust, or debris from spreading.
- Protecting Surrounding Areas: Cover any nearby surfaces or objects that you don’t want to be exposed to paint chips, dust, or chemicals. Use additional drop cloths or plastic sheeting to shield these areas and minimize the risk of accidental damage.
By carefully preparing the work area, you’ll create a safe and controlled environment for removing the bottom paint from your boat.
Removing the Bottom Paint
The process of removing bottom paint can be approached using various methods, depending on the condition of the paint and your preference. Here, we’ll explore mechanical removal techniques, chemical-based paint strippers, and alternative methods for removing bottom paint effectively.
Methods for Mechanical Removal
Mechanical removal involves physically sanding, scrubbing, or scraping off the bottom paint. This method is commonly used and allows for precise control over the paint removal process.
Sanding is a widely used technique for removing bottom paint. It involves using sandpaper or a sanding machine to abrade the paint layers until a clean surface is revealed. Follow these steps for effective sanding:
- Selecting the Appropriate Grit Sandpaper: Start with a coarse grit sandpaper (around 80-100) to remove the majority of the paint. Then, gradually progress to finer grits (120-220) for a smoother finish.
- Techniques for Effective Sanding: Use long, even strokes to sand the surface, applying consistent pressure. Sand in the direction of the grain to avoid creating unnecessary scratches or gouges. Frequently check the progress to ensure you’re not removing excessive material.
- Addressing Challenges and Safety Considerations: Some areas may be hard to reach with a sanding machine. In such cases, hand sanding or using sanding blocks can provide better control. Ensure you wear safety goggles, a respirator mask, and protective gloves to protect yourself from dust and potential hazards.
Scrubbing and Scraping
Scrubbing and scraping are effective methods for removing bottom paint, particularly in areas where sanding may not be suitable or accessible. Follow these guidelines for successful scrubbing and scraping:
- Using Specialized Brushes and Scrapers: Select stiff-bristle brushes or putty knives to scrub and scrape off the paint. Nylon or wire brushes can be effective for loosening the paint, while putty knives are useful for gently scraping it away.
- Techniques for Removing Paint without Damaging the Hull: Use circular motions with the brushes to dislodge the paint. Apply moderate pressure while scraping to avoid damaging the hull. Take your time and work in small sections to ensure thorough removal.
By employing these mechanical removal techniques, you can effectively strip off the bottom paint from your boat. However, if mechanical methods are not suitable or if you’re dealing with stubborn paint, chemical-based paint strippers can be a viable alternative.
Chemical-Based Paint Removal
Chemical paint strippers are formulated to dissolve and remove bottom paint effectively. Before using any chemical products, ensure you read and follow the manufacturer’s instructions carefully. Here’s how to use paint strippers for bottom paint removal:
- Types of Paint Strippers and Their Effectiveness: There are various types of paint strippers available, such as solvent-based or water-based options. Consider the type of bottom paint you have and choose a stripper that is compatible and effective for its removal.
- Step-by-Step Process for Using Paint Strippers: Apply the paint stripper generously over the painted surface using a brush or roller. Allow it to sit for the recommended amount of time, as specified by the manufacturer. The paint stripper will soften the paint, making it easier to scrape off.
- Safety Precautions and Protective Measures: Chemical paint strippers can be potent and may emit strong fumes. Ensure you work in a well-ventilated area or use additional respiratory protection. Wear gloves and protective clothing to avoid direct contact with the stripper.
Chemical-based paint removal can be an effective method for tackling stubborn or multiple layers of bottom paint. However, it’s essential to handle these chemicals with care and dispose of them properly after use.
Other Alternative Removal Methods
Apart from mechanical and chemical-based removal techniques, there are alternative methods available for removing bottom paint from your boat. These methods offer unique advantages and can be useful in specific situations. Consider the following options:
Heat-Based Removal Techniques
Using heat to remove bottom paint involves the application of a heat gun or other heat sources to soften the paint, making it easier to scrape off. This methodprovides precise control and can be effective for small areas or intricate details. However, it requires caution to prevent damage to the underlying hull or surrounding materials.
High-Pressure Water Blasting
High-pressure water blasting, also known as hydroblasting, utilizes a powerful stream of water to remove bottom paint. This method is efficient for large surfaces and can quickly strip away multiple layers of paint. However, it may not be suitable for delicate or sensitive areas, and proper containment measures must be in place to manage the water runoff.
Media Blasting and Soda Blasting
Media blasting involves using abrasive materials such as sand or walnut shells to blast away the bottom paint. Soda blasting, on the other hand, uses sodium bicarbonate (baking soda) as the abrasive material. Both methods are effective for removing paint from various surfaces, including boat hulls. However, they require specialized equipment and expertise, making them more suitable for professional boatyards or experienced individuals.
It’s important to evaluate the feasibility and potential risks associated with alternative removal methods before proceeding. Consider consulting with professionals or experienced boat owners to determine the best approach for your specific boat and bottom paint condition.
Dealing with Residue and Clean-up
Once you have successfully removed the bottom paint, you may still have residual paint or debris to address. Here’s how to handle residue and ensure a clean work area:
- Removing Any Remaining Paint or Residue: Inspect the boat’s surface for any remaining traces of paint or residue. Use scrapers, brushes, or sandpaper to gently remove any stubborn spots. Take care not to damage the hull during this process.
- Proper Disposal of Hazardous Materials: Bottom paint may contain toxic substances, so it’s crucial to dispose of any paint chips, dust, or chemicals in a responsible manner. Check with your local authorities or waste management facilities for guidelines on proper disposal.
- Cleaning and Restoring the Boat’s Surface: After removing the paint and residue, thoroughly clean the boat’s surface using mild detergents or specialized boat cleaners. Rinse the surface with clean water and allow it to dry completely before proceeding with any repairs or applying new bottom paint.
Taking the time to ensure a clean and residue-free surface will pave the way for a smooth and successful repainting process or the application of protective coatings.
Evaluating the Hull and Repairing Damage
During the bottom paint removal process, it’s essential to inspect the hull for any underlying damage or issues. Addressing these concerns promptly will help maintain the structural integrity of your boat. Consider the following steps:
- Inspecting the Hull for Any Underlying Issues: Carefully examine the hull for signs of blistering, cracks, or other damages that may require attention. Use a flashlight to inspect hard-to-reach areas or consider consulting a professional surveyor for a thorough assessment.
- Addressing Blistering, Cracks, or Other Damages: If you encounter blisters or cracks, consult with a boat repair specialist to determine the best course of action. Depending on the severity of the damage, repairs may involve filling, fairing, or patching the affected areas.
- Necessary Repairs and Surface Preparation Before Repainting: Before applying new bottom paint, ensure all necessary repairs are completed. Smooth out any repaired areas, remove loose or flaking paint, and thoroughly clean the hull to create an optimal surface for the new paint.
By addressing underlying issues and performing necessary repairs, you’ll ensure the long-term health and performance of your boat.
Choosing a New Bottom Paint
Once you have successfully removed the old bottom paint and prepared the hull, it’s time to choose a new paint that suits your specific needs. Consider the following factors when selecting a bottom paint:
- Factors to Consider When Selecting Bottom Paint: Take into account the type of boat, its usage (freshwater or saltwater), and your desired maintenance schedule. Additionally, consider environmental regulations or restrictions that may influence your choice of paint.
- Different Types of Bottom Paint Available: There are various types of bottom paint on the market, including ablative, hard, or hybrid paints. Each type offers different benefits in terms of durability, anti-fouling properties, and ease of application. Research different brands and consult with professionals or fellow boaters to make an informed decision.
- Environmental Considerations and Regulations: Ensure the bottom paint you choose complies with local environmental regulations to minimize the impact on aquatic ecosystems. Some areas may have restrictions on certain types of bottom paint, so it’s crucial to stay informed and choose an environmentally responsible option.
By carefully selecting the right bottom paint, you’ll not only enhance the boat’s performance but also contribute to the preservation of our waterways.
Applying a Fresh Coat of Bottom Paint
Applying a fresh coat of bottom paint requires attention to detail and proper technique. Follow these steps for a successful application:
- Steps for Preparing the Surface for New Paint: Thoroughly clean the hull to remove any dust, debris, or contaminants. Lightly sand the surface to promote adhesion between the hull and the new paint. Use a tack cloth or a vacuum to remove any sanding residue.
- Techniques for Applying Bottom Paint Evenly: Start by stirring the paint thoroughly to ensure proper mixing of its components. Use a brush, roller, or sprayer to apply the paint evenly, following the manufacturer’s instructions regarding coverage and drying time. Apply multiple coats if necessary, allowing sufficient drying time between each coat.
- Recommended Number of Coats and Drying Time: The number of coats required may vary depending on the type and brand of bottom paint. Typically, two to three coats are sufficient to provide adequate protection and anti-fouling properties. Allow each coat to dry completely before applying the next.
Remember to work in a well-ventilated area and wear appropriate safety gear throughout the painting process. Following these guidelines will help ensure a professional-looking finish and long-lasting protection for your boat’s hull.
Maintenance and Future Bottom Paint Removal
Once the new bottom paint is applied, it’s important to establish a regular maintenance routine to extend its lifespan and preserve your boat’s performance. Consider the following tips:
- Tips for Maintaining the Boat’s Bottom Paint: Regularly inspect the bottom paint for any signs of wear, blistering, or excessive fouling. Clean the hull as needed using gentle scrubbing or light pressure washing, being careful not to damage the paint. Perform any necessary touch-ups or repairs promptly.
- Signs to Watch for When It’s Time to Remove Paint Again: Keep an eye out for significant deterioration, such as excessive flaking or loss of anti-fouling properties. If the paint becomes ineffective in preventing marine growth or protecting the hull, it’s time to consider removing it and applying a fresh coat.
- Importance of Regular Inspections and Upkeep: By regularly inspecting the bottom paint and addressing any issues promptly, you’ll maintain optimal performance, reduce maintenance costs, and extend the lifespan of your boat’s hull.
Establishing a proactive maintenance routine will help you make the most of your bottom paint investment and keep your boat in peak condition for years to come.
Removing bottom paint from a boat requires careful evaluation, proper preparation, and appropriate removal techniques. By assessing the condition of the existing paint, gathering the necessary tools, and selecting the most suitable removal method, you’ll ensure a successful project. Remember to handle hazardous materials responsibly, address any underlying issues, and follow best practicesfor surface preparation and application of new bottom paint. Regular maintenance and inspections will help you maintain the integrity of your boat’s hull and maximize its performance on the water. By following the steps outlined in this comprehensive guide, you’ll be well-equipped to remove bottom paint effectively and keep your boat looking and performing its best. Happy boating!
Related posts:
- How to Apply Bottom Paint to a Boat
- What is the Best Bottom Paint for Boats
- How To Paint A Boat Camo
- How To Paint A Jon Boat
- How To Remove Old Paint From Kitchen Cabinets: Simple Steps for a Fresh Look
- How To Remove Fine Scratches On Car Paint
- How To Remove Paint From Wood Floor
- How To Remove Chalk Paint From Clothes
- How To Remove Paint From Roof Shingles
- How To Remove Spray Paint From Clothes
Leave a Reply Cancel reply
Your email address will not be published. Required fields are marked *
Save my name, email, and website in this browser for the next time I comment.
Please verify you are a human
Access to this page has been denied because we believe you are using automation tools to browse the website.
This may happen as a result of the following:
- Javascript is disabled or blocked by an extension (ad blockers for example)
- Your browser does not support cookies
Please make sure that Javascript and cookies are enabled on your browser and that you are not blocking them from loading.
Reference ID: c555f82c-6d57-11ef-9a06-eedd595a6ec5
Powered by PerimeterX , Inc.
How To Remove Bottom Paint From A Fiberglass Boat
If you own, rent, or lease a boat, make sure the bottom is painted, especially in cold climates where the water stays cold for extended periods.
When sailing fiberglass watercraft for a long, such as during summer, ensure the hull is well maintained. Salt and prolonged exposure to water can cause them to develop a white growth or slime on their exterior that can rip away an inadequately maintained hull.

However, when you spray marine paint on your boat exterior, it hardens when it comes into contact with water, making slime and growth more difficult to form.
It’s difficult to remove these paints and, if done incorrectly, can cause harm to your hull. Additionally, it can take some time and elbow grease. So, if you are interested in removing some old, crusty hull paint or simply want to know how to clean it, this guide can point you in the right direction.
Types of Removing Boat Bottom Paint
A couple of options are available to effectively remove your watercraft’s bottom paint. The best method depends on how long the paint has stayed and your level of experience, as it will ensure you get it removed safely with minimal effort.
If you’re ready to repaint, then here are some options for removing the hull’s paint:
Sanding
The bottom color removal from a fiberglass watercraft can be a complex operation. Before commencing any work on your boat, wear safety clothing. We recommend wearing gloves and eye protection.
The first step is to ensure that you have all the tools and supplies for the project. You will need the following items for this:
- Paint scraper
- Orbital sander
- Paint thinner
The second step is to clean the exterior of your boat when you have everything ready. With a wire brush, remove any stray pieces of fiberglass or gel finish that have chipped off over time. If you don’t clear it off beforehand, you can scrape the hull or harm other parts of your boat during this operation.
Then, begin sanding any portions of the surface texture that have defects. Work your way up through each successive grade until you’ve removed all flaws from your hull.
Soda Blasting
Like sanding, follow all the safety precautions when soda blasting your boat. Always wear eye and hearing protection as baking soda can cause damage to both eyes and ears.
While utilizing soda blasting, remember to follow your state’s environmental standards about sustainable use and disposal methods. The use of larger crystals of ordinary baking soda decreases environmental risks. Using this method can be an easy and effective way to remove the build-up and chipped paint without damaging the fiberglass.
Soda blasting necessitates some planning since you need to purchase a few items from a hardware store. Here are some pointers to follow when using baking soda to clean the exterior paint from your fiberglass boat :
- Make sure you have all your supplies ready for starters. To make a baking soda blast, you’ll need the following items:
- Large plain regular, or coarse baking soda crystals
- A power washer
- Pair of gloves and respirator mask
- An air compressor with a proper nozzle size for your watercraft as a soda blaster
- Mixing and rising buckets
- Confirm that the exterior part of the boat is clean and dry. If not, clean it first and then wait for it to dry before beginning the soda blasting.
- Check the instructions on the soda blaster and make a batch of baking soda with water. If there are no given instructions, use 2 parts baking soda per gallon of water, but add more if it still does not bubble up enough. Concentrate the mixture to get a sparkling clean fiberglass boat bottom.
- Then connect a hose to both ends of the air compressor: a supply of compressed air and a drain hose.
- Put on your protection gear-respirator and earplugs.
- Point your soda blaster toward the boat’s exterior and blast away, revealing a clean hull. Finally, rinse.
Chemical Stripping
There are two types of chemical strippers: acidic and alkaline.
Acidic cleaners chemically break down the build-up and paint on your fiberglass boat bottom, making it easy for you to scrap it off. To make a mixture of acidic strippers, you need hydrochloric acid and water. Luckily, this acidic mixture will not affect any metal components on your boat, such as zincs or stainless-steel gear. However, you must soak your hull for at least 24 hours before scraping it off with a putty knife or scraper blade.
On the other hand, alkaline strippers function by combining with the gel coat undercoat, making it easy to scrape or sand off. Apply the alkaline strippers according to the label instructions, then wait before sanding or scraping any leftover residue.
Tips on Removing your hull’s Paint from a Fiberglass Boat
If you own a fiberglass boat, remove the bottom boat paint regularly. Clean your boat’s hull if your paint has chipped or if you just need a new fresh coat of paint. Cleaning up the boat’s exterior paint is easy, but it takes time and effort.
Here are a few tips that might make your hull cleaning process easier:
- Take your items off the watercraft as you may risk damaging them when cleaning.
- Have all the materials you’ll need depending on the watercraft’s exterior cleaning method.
- Have some rags on hand to dry off after washing the boat so that water doesn’t leak into places it shouldn’t while you’re at work.
- As you clean the bottom of the boat, make sure there are no other boats around. It could be hazardous if the boats collide while operating with chemicals or other potentially hazardous substances.
Key Takeaway
Bottom paint is a necessary evil on fiberglass boats—it protects the hull from water and the corrosive effects of salt. Because the paint on your boat will eventually fade, you can keep it to a minimum by taking proper care of your vessel. Having a few tips and the know-how for removing the hull paint on hand can help you take proper care of your boat.

- Recent Posts

- The Role of Cargo Ships in Global Trade – August 22, 2024
- Report: Yang Ming’s YM Mobility Explosion at Ningbo-Zhoushan Port – August 9, 2024
- Understanding Drillships: Types, Key Features and Advancements – August 1, 2024
About the author
I worked as an officer in the deck department on various types of vessels, including oil and chemical tankers, LPG carriers, and even reefer and TSHD in the early years. Currently employed as Marine Surveyor carrying cargo, draft, bunker, and warranty survey.
Latest posts

The Quality Control Process in Marine Manufacturing
Companies in the marine manufacturing space must have tight and effective quality control processes. What steps should an effective quality control process include?

The Role of Cargo Ships in Global Trade
Contents show Volume of Goods Transported by Sea Key Global Trade Routes Economic Impact of Maritime Shipping Types of Cargo Commonly Transported Environmental Considerations Conclusion Cargo ships are the lifeline […]

What Are AGVs? Automation Becoming Increasingly Common in Seaports
What are AGVs? Automated guided vehicles can minimize the troubles of manual operations and enhance seaport operations.
Free Shipping On All Orders!
- Epoxy Resins
- Polyester Resin
- Urethane Resins
- Epoxy Project Supplies
- Antifouling Paints
- Topside Paints
- Thinners & Solvents
- Paint Supplies
- Wood Oils & Finishes
- Wood Finishing Supplies
- Cleaning & Polishing
- Accessories

Table Top Epoxy

Clear High Performance Epoxy Kits

5:1 Traditional Epoxy Resin Kits
- Thinners & Solvents

Wet Edge Topside Paint

Premium Marine Topside Primer

Spartan Multi-Season Antifouling Paint
- Wood Finishes
- Wood Oils & Finishes

Gleam Marine Spar Varnish

Lust Rapid Recoat Marine Spar Varnish

Halcyon Water-Based Marine Varnish

TotalBuff Rubbing Compound

TotalShine Finishing Compound

White Knight Fiberglass Stain Remover
- TotalBoat Gear

FlexFit Fitted Mesh Back Baseball Cap

Men’s Long Sleeve T-Shirt Hoodie

Women’s Long Sleeve T-Shirt Hoodie
FREE SHIPPING with a minimum puchase of $1,200.00 You are $10.00 away from your free shipping!
Shipping, taxes, and dicount codes calculated at checkout.
BOTTOM PAINTING

As a boat owner, getting dragged to the depths of the ocean by a giant sea monster is probably not high on your list of concerns. But make no mistake, there are some very foul creatures lurking beneath the waves.
We’re talking microscopic sea monsters: acorn barnacles, zebra mussels and slime-causing bacteria that cause serious hull drag, and wallet drain from higher fuel costs and repair bills.
You may not even know they’re there until it’s too late because they don’t come at you flailing ferocious tentacles, at least not ones you can see. What you will see—and want to prevent—is the ugly, dirty, slimy mess they make on the bottom of your hull that decreases your speed and increases your fuel bill because your engine has to work harder. A fouled hull bottom is also a safety risk because it can decrease your ability to maneuver.
Battle the barnacles and other biofouling bottom huggers with the right bottom paint for smoother sailing.
Choosing an Antifouling Bottom Paint
Location, location, location, types of antifouling bottom paint, which bottom paint is best for your boat, figuring how much paint you need, how to strike a waterline on your boat, bottom painting equipment, surface prep for bottom painting, best conditions for bottom painting, bottom painting like a pro.

The purpose of applying antifouling bottom paint is to prevent hard biofouling organisms like mussels, barnacles, and tubeworms, and soft growth like weeds and algae (slime!) from attaching to your hull below the waterline.
There are several different antifouling coatings available, with new ones being formulated all the time, making it very difficult to choose the paint that’s right for your boat and your budget. Some coatings work better in different locations, including fresh or salt water. Some are more environmentally friendly than others, and some cost more based on the type of biocide and the protection they provide.
The key antifouling ingredient in bottom paint is some type of biocide for deterring hard marine growth. Some antifouling paints also include an algaecide for preventing soft growth.
Biocide basics : For centuries, some form of copper has been used successfully to prevent the attachment of barnacles and other marine growth on hull bottoms. Today, the type of copper most commonly contained in antifouling paint is either cuprous oxide or cuprous thiocyanate. Cuprous thiocyanate has the added benefits of being a lighter copper in terms of color, so it produces brighter, truer paint colors. Also, paints using cuprous thiocyanate use half the amount of copper used in conventional, heavier cuprous oxide paints.
Because copper in the concentrations used in antifouling paints is a potential threat to some marine ecosystems, there are now equally effective, eco-friendly, antifouling paints that contain a metal-free biocide called Econea™ (main ingredient is tralopyril). Econea’s main benefit is that it dissolves after it is shed into the water, leaving no byproduct to harm marine life. Its secondary benefit is that it allows for the creation of brightly colored paints, unlike bottom paints containing cuprous oxide as the biocide.

Algaecide basics: If you use your boat in an area where slime, algae, and grass growth on the bottom of your hull are common, you need an antifouling paint that also contains an algaecide to prevent this soft growth. In the past, some antifouling paints contained an algaecide called Irgarol, which is no longer being used. Irgarol was discontinued because of its persistence after release into the water, and harmful effects on marine life. Zinc pyrithione (Zinc Omadine™) is now the slime-fighting agent used in many antifouling bottom paints. Its effectiveness is similar to Irgarol, but it dissipates quickly and harmlessly into marine or fresh water ecosystems. Zinc pyrithione is found in chemical solvent-based and water-based antifouling marine paints.
Chemical solvent-based or water-based antifouling paint? Another consideration is the type of solvent in the paint. Solvents keep the biocide, algaecide (if included), and pigment suspended in the paint so they’re distributed evenly in the coating as it’s applied to the hull surface. In the past, most antifouling paints contained harsh chemical solvents, and required the use of chemical solvents for thinning and cleanup. Those harsh chemical solvents contain toxic VOCs (volatile organic compounds) that evaporate easily into the atmosphere. To help meet environmental regulations in some areas of the country, and the world, there are now water-based paints, that also use water for thinning and cleanup. Many of these water-based antifouling paints contain the biocide Econea, and zinc pyrithione as the algaecide, because both dissolve in the water after release.
Won’t a water-based antifouling paint just dissolve and leave the hull unprotected while the boat is in the water? : The short answer is no. As the water-based paint cures, the water evaporates, leaving behind a protective film of biocide and/or algaecide, and pigment.
Teflon and vinyl bottom paints : Teflon paints are expensive, dry quickly, cure to a very thin film, and are ideal for fresh water areas where algae is a problem. Vinyl bottom paints are hard bottom paints that can be burnished smooth for racing, and are especially effective in saltwater, though not as effective as ablative paints for battling biofouling organisms. Both Teflon and vinyl bottom paints are used more to enhance performance, as in race boats, instead of antifouling.
Proprietary two-part bottom coatings : These products are new and expensive, using patented chemical formulas to create a hard and very slippery biofilm that doesn’t allow living organisms to attach to the boat.
Deciding on bottom paint is a regional, sometimes section-of-the-harbor-specific choice. It’s based on lots of variables like water temperature, silt, substrate, pollution, water flow, biofouling organisms present, and the frequency and type of boating you do.
Making that choice is made even harder because a bottom paint that works in one part of the harbor may not be as effective a few hundred yards away in that same harbor–even on the same type of boat.
The general consensus is there’s more fouling activity in warmer water and still water, and less growth in water that’s colder or where there’s more current flowing beneath the hull. It’s also harder for biofoulers to attach to a moving target, so the more you use your boat, the cleaner the bottom should remain.
At any rate, it’s always a good idea to ask fellow boaters and local boatyard professionals to help pinpoint paints that work best where your boat floats.

Bottom paints are usually one of two types: hard or ablative, with variations whose effectiveness depends on how much time the boat spends in the water, and how often it moves.
Hard bottom paints are typically less expensive than ablative antifouling paints. However, hard paints are effective for a single season, and they build up season after season, eventually requiring costly removal. Ablative paints come in single-season and multiseason varieties and don’t build up.

Hard bottom paint dries hard, stays that way, and doesn’t wear away gradually like an ablative paint. It works constantly while the boat is in the water, regardless of whether the boat is moving, and stops working once all its copper biocide gradually leaches out. So the coating can still be in great shape, but the biocide is gone and so is the protection. Water can seep in to the unprotected coating and damage the hull. Also, because hard bottom paint doesn’t wear away, it builds up and eventually has to be removed–a costly, labor-intensive endeavor.
Another problem for hard bottom paints is they lose their copper faster–and their effectiveness–if the boat is kept out of the water more than 60 days after applying bottom paint. For this reason, hard bottom paint is typically used on boats that remain in the water for extended periods. It’s also great for boats operated at faster speeds, like racing boats, because it can be burnished to increase hull smoothness and speed, unlike ablative bottom paints.
Ablative bottom paint wears away gradually as water flows under the hull, either from use or tidal movements. As the paint wears away, it exposes a fresh burst of biocide to keep biofoulers from attaching to the surface. There are ablative paints for multiple season use, and others that are effective for a single season. The single-season ablatives are typically less expensive than the multiple season ablatives.
For most ablative paints to work effectively, motion is required, so this paint is best if you use your boat fairly often–at least once a week. A hull painted with a single-season ablative antifouling paint can be pulled and left out of the water up to two weeks, but will require a light scuffing with a Scotch-Brite pad to reactivate the antifouling properties directly prior to launching.
A hull coated with a multi-season ablative can be pulled and left out of the water up to two weeks, without scuffing to reactivate the antifouling. However, after two weeks, scuffing is required directly before launching.
Self-polishing, copolymer ablative bottom paint also wears away gradually to expose fresh layers of biocide. However, it’s effective whether or not the boat is moving because it uses a self-polishing, controlled-release, copper copolymer formula. Some copolymer ablatives can last multiple seasons, requiring only a light scuffing to reactivate the antifouling in the spring, directly before launching.
Hybrid copolymer ablative bottom paint has all the self-polishing, controlled-release biocide benefits of a copolymer ablative. The difference is that it can also be burnished–like a hard bottom paint–for smoothness and speed, unlike other ablative bottom paints. And there’s less buildup to remove next season, as with hard bottom paints.
Preventing biofouling is not a one-shot-and-you’re-done deal, and no bottom paint is best for every boat. Your decision depends on answers to these practical questions.
What type of hull do you have? Most bottom paints contain copper as their antifouling biocide, which is fine for wooden, and fiberglass/gelcoat hulls, but causes galvanic corrosion, which will destroy a pontoon boat or an aluminum hull. For use on aluminum hulls, aluminum bottom paint typically uses a copper-free biocide such as Econea. Underwater metals such as outdrives and trim tabs also need this metal-free antifouling paint. And don’t forget the bottom of your inflatable, it needs protection, too. Inflatable bottom paint is ablative, so it wears away gradually, and is designed not to crack or peel while the boat is being rolled up, or after drying. What kind of water is your boat sitting in, and what’s the water temperature? In terms of temperature, biofouling levels are typically higher in warmer waters than cooler waters. Fresh water biofouling, while not as severe as saltwater (marine) biofouling, still poses problems which are compounded if the water is brackish or polluted. By far the biggest challenge comes from hard, marine biofouling organisms such as zebra mussels and barnacles, which destroy the hull surface and allow moisture in, causing blistering and other expensive damage. If moderate to heavy fouling is a problem in your region, you might consider a bottom paint that offers greater protection and lets you haul and relaunch without repainting, such as a multi-season paint. In lower fouling waters, you can get adequate single-season protection from a more economical bottom paint . The copper biocide (cuprous oxide or cuprous thiocyanate) or copper-free biocide (Econea) in these paints is designed primarily to combat hard shell marine growth. If slime is a problem in your area, use a slime-shedding bottom paint boosted with a slime-fighting agent (zinc pyrithione) that controls slime growth at the waterline. How and when do you use your boat? For example, do you trailer your boat? If so, you should use a harder ablative bottom paint that can withstand trailering. Do you race it or just like to go fast? Try a hybrid copolymer ablative that allows you to burnish the surface, and provides good single or multiple season protection. Do you go out every weekend? Every day? Do you want to be able to do your bottom painting at the end of the season so you’re ready to launch first thing in the spring? At TotalBoat, we’re DIY boaters that create products to suit every type of use in all types of waters. Do you live in an area that restricts the use of solvent and copper-based bottom paints? To address ever-increasing environmental regulations, some ablative bottom paints are now water-based and/or copper-free, containing an environmentally friendly biocide called Econea™, and fewer volatile organic compounds (VOCs). Other water-based ablatives contain copper for added antifouling protection, but offer easy soap and water cleanup. How much money do you want to spend on bottom painting? With bottom paint, usually the more biocide, or different types of biocide, the greater the cost. Also certain properties, like self-polishing, single or multi-season effectiveness, or slime-fighting ability, require the inclusion of certain additives, which can increase the cost. If you don’t need it, you shouldn’t have to pay for it, which is why we created a complete line of bottom paints to balance every boater’s needs and budget.
Figuring out the approximate surface area (in square feet) of your hull below the waterline is a good way to determine the amount of bottom paint you’ll need. Here’s an easy formula to use:
Length x Beam x .85
How heavily you apply the bottom paint is another factor in determining the quantity. The amounts below assume you want to coat the surface as thickly as possible without causing runs, and that you are applying two coats. For specific quantities, always refer to the manufacturer’s details on coverage areas.
| 14′ outboard | 1-2 quarts |
| 18′ runabout | 2 quarts |
| 20′ sailboat | 3 quarts |
| 24′ runabout | 3-4 quarts |
| 30′ sailboat | 1.5 gallons |
| 32′ cruiser | 1.5-2 gallons |
| 36′ auxiliary | 2 gallons |
| 40′ sailboat | 2.5 gallons |
| 45′ sailboat | 3-3.5 gallons |
| 50′ sportfisher | 4+ gallons |
Applying two coats of bottom paint up to the old waterline is a fairly straightforward task–if you know where the waterline is. Sometimes the line gets covered up by topside coatings, or it needs to be raised as the boat gets outfitted for cruising. Or you may have a new boat and need to find the waterline. Here’s a simple way to mark the waterline on your boat in preparation for bottom painting.
What You’ll Need for Bottom Painting
The safest and best way to do a DIY bottom paint job involves applying the paint with a brush or roller. Due to the substantial toxic hazards, spraying is not recommended.
If using a solvent-based antifouling paint, it’s important to use solvent-resistant roller covers, brushes, and paint trays and liners because the solvents in bottom paint are strong enough to dissolve regular household-type versions of these painting tools.
- Personal protection for sanding – paint suit with hood , goggles, and a respirator with appropriate cartridges, and gloves
- If bottom paint is cracking and peeling or otherwise requires removal (as in the case of hard bottom paint) use chemical stripper to remove it. Our TotalBoat TotalStrip paint remover is safe for gelcoat and fiberglass, and it’s easy to apply, odor-free, biodegradable, can strip up to 25 layers in a single application, requires no acid wash neutralization, and cleans up easily with just plain water. It’s also very effective on bottom paint.
- If previous bottom paint is in good condition and not too thick (only a couple of previous coats), you don’t need to sand it down, just scuff it up using a clean, maroon Scotch-Brite pad
- Paint scraper for removing loose or chipping antifouling paint to clean up the hull bottom before sanding
- When sanding down old bottom paint, use 80-grit large diameter sanding disks and a right angle grinder or dustless sander (recommended). 80-grit paper is the most common grit for sanding antifouling paint. Always use a dustless sander to keep the toxic antifouling paint sanding residue contained.
- Masking tape – solvent and water-resistant tape is ideal for lengthy bottom painting jobs that require two coats. This clean-release masking tape lifts off easily, leaving no gummy residue.
- Scratch-free cleaning and wiping rags and acetone or mineral spirits for removing surface dust and residue
- Solvent-resistant paint brush or 3/8" nap roller, paint tray and liner, plus small-width chip brushes for cutting in
- Drop cloths for any sanding debris, and for catching paint drips and spills
To ensure the best possible bond and the most effective antifouling results, take time to assess the type and amount of surface preparation needed. Typically, most ablative bottom paints can be applied over hard paints, but not the other way around. Also most other antifouling paints can’t be painted over vinyl or Teflon bottom paints. Incompatible paints must be removed first. Substrate matters, too, so for example, if you’re painting on steel or aluminum, check that you coat the surface with an appropriate metal primer first. Incompatible bottom paint or previous bottom paint that is extremely deteriorated should be stripped first. Use a chemical stripper that works with bottom paint to remove it. If you stripped the old antifouling and found hull damage or damage to the barrier coat, or if you’re painting a new boat for the first time, you’ll need to apply an epoxy barrier coat before applying bottom paint.
Cleaning Tips
In many cases, you’ll be painting over a previous bottom paint job that’s in good condition, so you don’t need to strip the paint or sand. Just chip away any loose paint with a paint scraper or putty knife, then abrade with a medium-grade 3M ScotchBrite pad, then wipe the surface with a clean, lint-free cheesecloth, rag, or tack cloth dampened with acetone or mineral spirits (or thinner recommended by the paint manufacturer) to remove residual dust and grease, let dry, then apply masking tape.
Sanding Tips
If you need to sand, sanding makes a mess, so first lay down some drop cloths under and around your work area. Sanding bottom paint also creates toxic dust, so use a dustless sander. And protect your exposed eyes, skin, and lungs with high-quality protective equipment before you begin sanding.

Masking Tips
For the cleanest line, try to position the tape as close to the bootstripe as you can, beginning at a natural start point in the line. Draw the tape out slowly, outlining every 1.5 to 2 feet. In addition, mask around underwater metals to protect them from contact with any copper-based antifouling paint.
Use 80-grit sandpaper to sand the entire bottom to smooth it out and remove any high or uneven spots. Sand lightly so you don’t sand through a protective barrier coat or damage gelcoat. After sanding, wipe down the surface using the solvent recommended by the bottom paint manufacturer.
After masking, and before painting, wipe the surface with a clean, lint-free cloth to remove any residual dust or dirt.
Getting great performance from your antifouling paint takes more than just completing the surface prep properly so the paint has every chance to bond mechanically and chemically to the hull. You also have to apply the paint when the timing is right in terms of temperature and humidity.
Resist the urge to start painting until temperatures are between 50°-85°F and the humidity is between 65 and 90%, or according to the manufacturer’s specifications. Be patient and wait for the weather to cooperate. You’ll be rewarded not just with optimal antifouling effectiveness, but with better looking, longer lasting results.

Before you start, pay attention to the dry time between coats and the recommended number of coats, as indicated by the manufacturer. Also, be sure to check if there are any maximum limits on the amount of time the boat can remain out of the water after bottom painting and prior to launch. For example, copolymer ablative paints dry faster, which means their overcoating times are shorter. They also have longer or unlimited launch windows.
Once you know the characteristics of your coating, and you’re ready to paint, here are some tips to expedite the process.
- To make it easier to get as much copper off the bottom of the can and into the paint, take it to a paint shop and have it shaken first. This will make it easier for you to stir the paint thoroughly.
- Do not thin bottom paint or it will lose its antifouling effectiveness.
- Use a solvent-resistant brush or 3/8" nap roller to apply paint thickly, without drips, onto the hull. Keep the thickness even, and paint from one end of the boat to the other.
- Because ablative paints wear away faster in areas of greatest turbulence, apply extra coats to these places such as the leading edge of the keel and the bow.
- Remember to paint underwater metals such as transducers, with a copper-free antifouling paint that will not cause galvanic corrosion.
- Recoat based on the manufacturer’s directions for overcoat times. Ensure that the weather conditions are optimal for recoating.
- After the final coat of bottom paint has dried, remove the masking tape slowly and carefully. After cleaning up, be sure to dispose of used solvent and paints properly.
- Choosing a selection results in a full page refresh.
- Forums New posts Unanswered threads Register Top Posts Email
- What's new New posts New Posts (legacy) Latest activity New media
- Media New media New comments
- Boat Info Downloads Weekly Quiz Topic FAQ 10000boatnames.com
- Classifieds Sell Your Boat Used Gear for Sale
- Parts General Marine Parts Hunter Beneteau Catalina MacGregor Oday
- Help Terms of Use Monday Mail Subscribe Monday Mail Unsubscribe
Question on Removing Bottom Paint
- Thread starter Rick486
- Start date Dec 30, 2019
- Forums for All Owners
- Ask All Sailors
Hello all, and wishing everyone a happy and healthy 2020! I do have a question also concerning bottom paint removal. We bought Maxine new in 2008 and immediately applied 2 coats of barrier coat before the first bottom paint. Since then we have applied a thin coat of Petit Trinidad SR each Spring. Maxine winters on the hard. I believe it is time, maybe past time, to remove the residual bottom paint. The question I have concerns the barrier coat. Is the barrier coat necessarily destroyed in the paint removal process so I would also need to re-apply that also? This is an expensive evolution to remove the paint so I am trying to avoid the added expense of a new barrier coat. Thanks Rick

Nice putting on the barrier coat! What system did you use? Why do you feel you need to remove the current bottom paint? In any case, to remove the bottom paint, I would do it by sanding. As you get close to the barrier coat, use a finer sandpaper which will then roughen up the barrier coat preparing it for your new bottom paint. This needs to be done with care, and is one of my least favorite jobs in boat work... Unless I had some kind of problem with bottom paint build up that was giving me some kind of issue, I would not do this. dj

justsomeguy
dLj said: Why do you feel you need to remove the current bottom paint? Click to expand

Davidasailor26
dlochner said: Applying coats in alternating colors will help determine when it is time repaint as the outer coat has worn away, when there is a lot of white showing through the blue, it's time. Click to expand
Davidasailor26 said: Unfortunately if you stick with a hard paint like Trinidad this trick won’t work for you. Trinidad loses its antifouking properties once it’s out of the water, so you need to add a coat at the end of winter whether the old one is worn through or not. ( Activating Hard Antifouling Paint - Inside Practical Sailor Blog Article ) Also, hard paints tend to leach out all of their Nicole while the substrate is still in place. Click to expand

Serenity on Hudson
Bought a boat that was kept in the water in Florida full time. It had Trinidad on it. Had the marina put a coat of ablative paint over the hard coat and it worked well with no barnacles attaching except on the wing keel that often site in the muddy bottom of the Hudson River. The motion from wakes looks like it erodes the bottom paint somewhat off the keel. Having just got the boat last spring, I forgot that the rudder was stored in the boat wrapped in cardboard and did not get a coat of ablative paint. At the end of summer, the rudder had half inch of barnacles on it. The Trinidad was useless in the fresh water of the upper Hudson after spending a year on the hard. Lesson learned. At least the barnacles let me know the boat was moving adding the sound of motion to the visual. Still routinely reached hull speed in spite of the drag. I power wash the bottom at the end of the season and it appears to remove the bulk of the bottom paint so I do not have to worry about build-up. Will have a new coat of ablative on in the spring for launch. Will ask for a double coat on the wing and see how that goes.
Project_Mayhem
There are a few exceptions to the sanding before re-applying (such as VC-17) so I would recommend checking the paint's instruction/spec's literature
Serenity on Hudson said: I forgot that the rudder was stored in the boat wrapped in cardboard and did not get a coat of ablative paint. At the end of summer, the rudder had half inch of barnacles on it. The Trinidad was useless in the fresh water of the upper Hudson after spending a year on the hard. Lesson learned. Click to expand

There are some chemical paint strippers that will remove antifouling bottom paint but will not remove the barrier coat. If would be helpful to know the brand of barrier coat on your boat before deciding on using a chemical stripper. I used a product called "Peel Away" to strip the paint off a previous boat. The existing "Interprotect 2000e barrier coat was uneffected by the chemical stripper which is also safe to use on fiberglass.
I used TotalBoat's stripper in the past. Lather it on, cover it up, paint falls to the ground. Not sure if it would take off barrier paint since my boat didn't have any. Fumes aren't too bad either.
Pirate Dave
The expensive way to remove paint is soda blasting. This may mean applying another coat or two of barrier paint before applying the antifouling. NO NO NO. That will take the barrier coat off as well !!!!! Either sand it down with 80 grit and paint over the old paint, or remove it with a sander. You will see the color change when you get to the barrier coat. It is either white or grey
Crazy Dave Condon
As a former dealer it is time to remove the anti fouling paint which according to your message it has 17 coats of Trinidad SR which should have been removed sooner. I would also recommend checking the policy removing paints in your area, marina, etc... If sanding please do it with a vacuum system as dust will collect on other boats and will cause issues that may cost you if not careful. Also wear protective gear as well. As for paint removal we use to scrape as much off and then sanded using a vacuum system due to other new and used boats around. As for barrier coats leave them on. I was surprised that 4-5 coats were not applied originally. It is true that many paints loose their affectivness after 60 days in air. Maybe there is an alternative but would suggest asking what works best in your sailing area
Crazy Dave Condon said: I was surprised that 4-5 coats were not applied originally. Click to expand

On our B411 I had failing bottom paint. The paint was delaminating several layers deep. Stripped the forward half of the hull using Peel-Away (red label leaves the barrier coat). Trowel on approx 3/16" thick and immediately followed by a special paper layer. Left it on 2-3 days in early (read cool) spring. Where the stripper stayed on, the stripping was amazing and easily removed 10+ paint layers. However, on the very bottom of the hull where the hull surface flattened out, the stripper was too heavy for the weakened paint and the paper/stripper fell away before the full stripping effect occurred. Did the rear half of the boat the next year and had the same issue followed by many, many hours of sanding. Spent $750 on stripper and $50 on sanding disks plus close to 40 hours sanding. I did the barrier coat multiple layers per mfg. instructions. One of the barrier paints is a High-Build so there are fewer coats. Would shop around for a good soda blast price and maybe partner with another boat if I did it again.
@dLj It was standard for many yards regarding barrier coat to apply that many coats and contrary to what was said it worked without incident but when applied it was thin coats, not thick

Captain Larry-DH
RitSim said: Spent $750 on stripper and $50 on sanding disks plus close to 40 hours sanding. I did the barrier coat multiple layers per mfg. instructions. One of the barrier paints is a High-Build so there are fewer coats. Would shop around for a good soda blast price and maybe partner with another boat if I did it again. Click to expand
- This site uses cookies to help personalise content, tailor your experience and to keep you logged in if you register. By continuing to use this site, you are consenting to our use of cookies. Accept Learn more…

Boating Basics Online is reader-supported. When you buy via our links, we may earn a commission at no cost to you. Learn more
How to Remove Boat Bottom Paint? – A Detailed Guide
Written by J. Harvey / Fact checked by S. Numbers

Whether you’re prepping for a repaint, doing repairs, or just want the old bottom paint on your vessel gone, this guide on how to remove boat bottom paint will teach you the most foolproof ways possible.
Either of these methods always saves me time and effort. Also, who wants to do a lot of sanding and inhale all that paint dust?
I’ve tried every bottom paint removal technique and have arrived at these two, and I encourage you to give either one a try for the superior results I’m talking about.
Table of Contents
Ways to Remove Boat Bottom Paint
1. paint the stripper onto the hull, 2. as you paint, lay the plastic sheet covers on the areas you’ve finished, 3. wait an entire day then peel the plastic back, then start scraping, 1. put on your ppes then start applying the stripper, 2. wait for an hour or an entire day, 3. start removing the old paint, then sand as needed, things to consider to protect the environment, cost to remove boat bottom paint, what happens if you don’t remove the boat bottom paint, helpful tips/faqs.
I use chemical strippers and do so in two ways based on the materials I have available.
- Plastic + stripper
- Scraper + stripper
Like plenty of boaters out there, I was sanding bottom paint mainly in the past, and all it did was lengthen the time to get results I wanted.
I reckoned since most of my peers have moved on to primarily stripping boat paint, I also needed to freshen up my approach to removing bottom paint.
So, yes, I’m a fan of stripping more than sanding. I removed paint from fiberglass boat and from gelcoat using chemical strippers, and the amount of time it saved me just isn’t comparable.
Note before starting:
We’re relying mostly on chemicals, so we need to be smart with the locations we’re going to do this thing. You have to be mindful of the environmental impact of chemical strippers. Incidentally, I implore you to go non-toxic as much as possible.
It’s highly recommended to do your bottom paint removal and other preparation steps in a well-ventilated location where you can easily contain the possible toxic wastewater that will be created. Don’t do it in a place where the wastewater will find its way into sewers and open water.
Steps for Plastic + Stripper Method
What you need to prepare:
- Stripping gel like Citristrip or any chemical stripper
- Plastic covering sheets
- Paintbrush, roller, or paint sprayer
- Painter’s tape (optional)
- Pain scraper
- PPEs (gloves and safety goggles)
Put on your PPEs first. Read the instructions on how to apply the stripper you’re using. For CitriStrip, the instructions say I need to apply a thick coat and wait for an entire day at most for the effect to play out.
That’s what I’ve done for most of my projects, and I get the results I want every time. Use any of the three painting tools you like. Depending on how adept you are at using it and the vessel’s size, expect this to take only a few hours or more.

You can either apply the paint on the surface or underneath the side of the sheets that will be sticking to the old bottom paint. Just make sure that the plastic will stay in place over the areas where you applied the stripper. This is where using the tape comes in.
I recommend you put the tape on the bottom paint’s upper edges, but feel free to find a better setup.

If you haven’t got the time, wait for at least 3 to 5 hours before removing the sheets. Afterward, you can start scraping the treated paint off. You should be able to knock off big chunks of paint in no time.
Sand off any stubborn residue that the stripper didn’t take off. The advantage of sanding post-stripper application is that the old coat will likely fall right off with minimal effort and produce less dust.
How long you should do this step depends on how thick the layers of paint are or your purpose for removing the old coat.
- If you’re just doing a new bottom job, then you don’t need to remove all the chunks, just the bad ones.
- A copper coat will typically require you to do a full removal.
Guide for Scraper Only + Stripper Technique
- Chemical stripper (I like to use Total Strip paint remover or Back to Nature’s Aqua-Strip)
- Bucket for catching paint strips
- Pressure washer (optional)
- Sander with 2000-grit sandpaper

Read the instructions on how to apply the bottom paint stripper. What I like about this method is that it skips the plastic sheeting and saves me more time. I just need to dab the stripper on the entire length and width covered by the old bottom paint, and it will do the work for me.
Just apply the coats evenly. As long as the stripper makes contact with the old paint, it should start doing its magic.

If I use TotalBoat’s Total Strip, I tend to follow the manufacturer’s instructions to wait 24 hours. With the Aqua-Strip, an hour will suffice. That should help you make your choice for the stripper to use if you have time to burn or not.
On the whole, both give me consistently amazing results in all the years I’ve used them.

Once the stripper has settled and you’ve waited the recommended time, pick up your scraper and bucket then begin removing the original antifouling paint coat. Peel away bottom paint and take off as many layers as you can, so you won’t have to sand as much later on.
Even so, you’ll probably want a smoother, cleaner finish, so don’t skip sanding. I use a 2,000-grit mostly for that nice, smooth finish. You can finish with the pressure washer if you like, but I often make do without it.
Wipe down the sanded surface to finish.
Part of the reason why I prefer the first method is that it’s not toxic to me, but can I say the same for its environment-friendliness? Yes, especially if you know your alternatives.
- Choose a safe location to do your project, such as the one I mentioned above.
- For one, you can always replace any toxic paint remover with a non-toxic one. Try looking at soy-based and citrus-based products like Citri-Strip.
- Do more sanding if you really don’t mind the effort and time required. The less you rely on toxic strippers, the better.
- Many swear by soda blasting boat bottoms, but it will require special equipment, starting with the soda blaster and air compressor.
Most owners who remove paint from aluminum boat report that sandblasting (a mix of soda blasting and sanding) works best for them. The same goes for their steel-hulled counterparts.
Expect a removal service to charge $75 per foot at most to restore gelcoat for private vessels. Much like any service, bottom paint removal cost varies per company. Just two years ago, I was charged $50 per foot, and I don’t expect that to have changed at present.
If you refrain from removing old bottom paint from a boat, it will inevitably start affecting its performance. Damage to the gelcoat may slow it down and dampen the hull’s performance-boosting effect.
Also, can you live with the thought that that old paint is most probably flaking off from time to time? Just think of the environmental toll that would exact.
Can a pressure washer remove bottom paint?
Yes, oftentimes, you don’t have to worry about it damaging the gel coat. However, there is always a chance that it might, so be careful when going down this route.
Another downside is that some coats are too stubborn for a pressure washer to handle. It may be a good option if you want a quick way to get the looser chunks off quickly, but you’ll likely still need to sand, wipe, and scrape off layers if you’re going for complete removal of the old paint.
How often should you remove boat bottom paint?
If you’re doing a bottom paint repaint, you’ll likely need to remove the old coat at least once a year or two. If you decide to do this, you don’t need to take off and sand entire layers, only the ones that have gone bad, then paint on a fresh coat.
Based on my experience and the guide I’ve come up with, you definitely need to know how to remove boat bottom paint optimally. There are way too many steps that you can forgo, such as sanding for hours and days, using toxic chemical strippers, and doing the removal job in a risky place.
Do your best to stick to the methods (stripper + plastic or scraper), and I guarantee that you’ll save yourself from needless effort and produce excellent results that even the pros will envy. Never forget to put your safety and environment’s first and foremost when doing this yourself, though.

“My intention from the first day establishing Boating Basics Online is to provide as much help as possible for boaters who want to experience a first safe and convenient trip. So feel free to join us and share your beautiful journeys to the sea!”
- New Sailboats
- Sailboats 21-30ft
- Sailboats 31-35ft
- Sailboats 36-40ft
- Sailboats Over 40ft
- Sailboats Under 21feet
- used_sailboats
- Apps and Computer Programs
- Communications
- Fishfinders
- Handheld Electronics
- Plotters MFDS Rradar
- Wind, Speed & Depth Instruments
- Anchoring Mooring
- Running Rigging
- Sails Canvas
- Standing Rigging
- Diesel Engines
- Off Grid Energy
- Cleaning Waxing
- DIY Projects
- Repair, Tools & Materials
- Spare Parts
- Tools & Gadgets
- Cabin Comfort
- Ventilation
- Footwear Apparel
- Foul Weather Gear
- Mailport & PS Advisor
- Inside Practical Sailor Blog
- Activate My Web Access
- Reset Password
- Customer Service

- Free Newsletter
Catalina 270 vs. The Beneteau First 265 Used Boat Match-Up

Ericson 41 Used Boat Review

Mason 33 Used Boat Review

Beneteau 311, Catalina 310 and Hunter 326 Used Boat Comparison

Tips From A First “Sail” on the ICW

Tillerpilot Tips and Safety Cautions

Best Crimpers and Strippers for Fixing Marine Electrical Connectors

Thinking Through a Solar Power Installation

Polyester vs. Nylon Rode

Getting the Most Out of Older Sails

How (Not) to Tie Your Boat to a Dock

Stopping Mainsheet Twist
Fuel Lift Pump: Easy DIY Diesel Fuel System Diagnostic and Repair

Ensuring Safe Shorepower

Sinking? Check Your Stuffing Box

The Rain Catcher’s Guide

What Do You Do With Old Fiberglass Boats?

Boat Repairs for the Technically Illiterate

Boat Maintenance for the Technically Illiterate: Part 1

Whats the Best Way to Restore Clear Plastic Windows?

Giving Bugs the Big Goodbye

Galley Gadgets for the Cruising Sailor

Those Extras you Don’t Need But Love to Have

What’s the Best Sunscreen?

UV Clothing: Is It Worth the Hype?

Preparing Yourself for Solo Sailing

How to Select Crew for a Passage or Delivery

R. Tucker Thompson Tall Ship Youth Voyage

On Watch: This 60-Year-Old Hinckley Pilot 35 is Also a Working…

On Watch: America’s Cup

On Watch: All Eyes on Europe Sail Racing

Dear Readers
- Inside Practical Sailor
- Boat Maintenance
Bottom Paint Removal Decision Time
Is the money saved removing bottom paint yourself worth the time and effort.

Tempis fugit . . . times a-waistin’ . . . fast flies the irreparable hour . . . However you choose to use your scarce time, we’ll wager that you’d rather not spend it removing bottom paint. If you are an owner of an older boat with a decade of accumulated hard bottom paint that is flaking and cracking, now is a good time to start weighing your options for removing the old paint. Should you do it yourself, or hire the professionals—or a bit of both?
In past reports on removing bottom paint and barrier coats, we’ve explored various methods to do the job safely. But more recently, in the light of our depleting youthful vigor, a diminishing number of do-it-yourself boatyards , and the need for personal protection against fine particles and organic vapors , our enthusiasm for a do-it-yourself approach has steadily waned. Although the substantial cost involved in renewing a bottom can be daunting, keep in mind that money and labor invested now will make subsequent bottom jobs faster and cheaper, so there is a residual benefit. Provided you have access to a do-it-yourself yard, are serious about personal protection, and don’t overextend the periods between reapplying bottom paint, your next decade of antifouling jobs could be do-it-yourself jobs.
As I recover from my own five-week long do-it-yourself paint removal project, I am reminded of a report by Ralph Naranjo, a former boatyard manager, marine safety expert, and Practical Sailor editor-at-large. Ralph was one of the last Practical Sailor testers to undertake a comprehensive test of coating removal methods and products (see “ A Smorgasboard of Tools Required for the DIY Epoxy Barrier Coat Removal ”). An excerpt from that report appears below (“Is It Worth It?”), along with Ralph’s guide for estimating the amount of time required for any boat bottom project (“A Mathematical Decision-maker”). The DIY work calculator first appeared along with Ralph’s report on Soda blasting, “ Soda Blasting 101 .”

Not long after Ralph’s report, we went back into the boatyard and followed the bottom restoration of a Bristol 35.5 owned by the publisher. The Bristol, however, got the royal treatment, as the owner handed the project over to local professionals. The work and materials tallied in the table below are detailed in the report “ Bottom Paint Makeover .”
If you are still in the water as you consider these options, we also have two helpful boatyard reports for those still choosing a yard “ Do it Yourself Boatyards ,” and “ Do it For Me Boatyards .” Hopefully, you are already out sailing, and the next haulout is from your mind. But if you have decided to finally “bite the bullet,” as Ralph puts it, I hope these reports can help. If you have specific questions about removing, choosing, or applying bottom paint, or if you have a boatyard to recommend, you can email us at [email protected] .

Is it Worth It?
At the conclusion of the paint removal ordeal (two full weeks), I asked myself, “Is this scale of commitment really what your typical DIYer should tackle?” The answer? An uncertain “maybe.”
The job certainly can be turned over to pros and is a prime candidate for media blasting, but many yards don’t want the airborne residue associated with the process. Tenting the boat or moving it into a building adds expense. And when all is said and done, the epoxy barrier coat is pretty immune to baking soda and may require blasting with a more aggressive grit that can tear into the gelcoat as well as remove the barrier coat. The slow and arduous combo of chemical stripping and sanding used to rid Wind Shadow of 26-year-old barrier coat left the gelcoat intact and provided an even surface over which to reapply the same epoxy system that had endured for over two decades.
Now that more and more barrier-coated boats are reaching the end of the paint’s lifespan, owners will be looking for answers about what to do next. If there is a significant amount of interlaminate blistering in addition to barrier-coat blistering, it may be time for a “peel.” This even more aggressive approach cuts all the way down to FRP laminate, removing barrier coat, gelcoat, and the pocked first layer of FRP laminate. Once the offending surface has been cleared away, the remedy is to re-laminate whatever schedule of material was removed. The new composite skin incorporates vinylester or epoxy resin, and the complete job includes re-fairing the surface, barrier coating, and finally bottom painting the underbody—a job that dwarfs the efforts bestowed on Wind Shadow , and one that will require professional intervention.

Those considering such a project as removing barrier coats should first evaluate their skill level, and then weigh the man-hours and cost of the project versus what it would cost to have a professional do it. In my case, removal options included subcontracting a soda blasting, which would cost $2,500 and would only rid the hull of antifouling paint, not the failed epoxy barrier coat. A heavy- grit media blasting to remove the epoxy—along with much of the gelcoat—was considered too aggressive for this project, although we did use it in a subsequent bottom job on another test boat.
Leaving the whole job to the pros would’ve been pretty costly: A “peel” or blast approach and the followup fairing, resurfacing, epoxy barrier coats, and bottom paint would run about $10,000-$15,000. Rates, of course can vary by region. We paid just under $8,000 to strip and refinish a Bristol 35.5 in Connecticut , and just under $5,000 to strip and refinish the bottom of a 30-foot Yankee 30 in Florida. Both were media blasted (soda-blasted in Connecticut, wet-abrasive blasted in Florida). In each of these two project, the paint and barrier coat removal accounted for $2,000 of the total cost.
Mathematical Decision Maker
So, how much work is it, really? An easy way to compute the do-it-yourself labor commitment involved is by timing how long it takes to scrape clean two 1-square-foot patches. The first is in the center of the least well-adhered paint; the second is in the midst of an intact portion of the bottom. Dry scrape each section with a thin-bladed putty knife and a sharp drag-type scraper, noting the time it takes to remove about 90 percent of the coating.

Next, estimate the percentage for the bottom that should be dubbed easy to scrape paint versus areas where the antifouling is stuck like glue. Finally, you need to roughly calculate the square footage of wetted surface area (WSA) that comprises the underbody. This is by no means an ordeal that requires advanced geometry. It’s a rudimentary calculation that requires only three bits of information (waterline length [Lwl], maximum waterline beam [Bwl] and draft [T]). The user-friendly formula (WSA = Lwl x (Bwl + T) applies to most heavy displacement cruising hulls. Multiply by 0.75 for medium-displacement vessels and 0.5 for light-displacement boats. This oversimplification of wetted surface calculation would provoke a scolding from David W. Taylor , William Froude , and other dons of naval architecture, but for a paint removal estimate, it works just fine.
Finally, take the results of the calculation and divvy it up according to the proportion of easy versus difficult regions of paint removal. For example, if only 15 percent of the bottom is cracked and peeling, and the removal time per square foot in this region is 30 seconds—as compared to four minutes per square foot in the well-adhered section—the ratio is by no means encouraging. Applying the ratio to the wetted surface calculation drives home the level of paint scraping required.

Let’s assume that the vessel has a 30-foot waterline, 6-foot draft, a waterline beam of 10 feet, and is a medium-displacement vessel. Our fuzzy math for a medium-displacement sailboat fills in the WSA equation as follows: WSA = 30 x (10 + 6) (.75), and the result is 360 square feet.
Next comes the all-important apportionment of easy versus difficult paint removal. In this case, 85 percent falls into the tough-going regime that equates to four minutes of toil per square foot (0.85 x 360 x 4 = 1,224 minutes of misery). Add in the easy scraping (0.15 x 360 x 0.5 = 27 minutes), and the result is 1,251 minutes, or just under 21 hours of serious scraping. This is unequivocal arm-in-action time, and the ride to the boatyard, coffee breaks, and chats with sistership owners, stops the clock.
This method to estimating work on the hull bottom could also be applied to a topside or deck project. Just be sure include some awkward work areas in your “sample” panels for estimating the total time required. Removing paint in some areas—cockpit corners, or near trim—can require two to three times more work than flat areas of the hull, and this needs to be taken into account.
Chemical paint removers, a large crew, or true friends can soften the blow, and so can a more deteriorated surface. If 70 percent of the bottom paint has a cornflake-like look, it will allow a thin bladed putty knife to effortlessly separate it from the hull skin, and a very different labor picture arises. Run the numbers, and you’ll find that in this scenario, 9.3 hours of toil would strip away the residue. In short, it’s not the bad spots you need to worry about, it’s where the paint looks good that causes all the problems. This is why procrastination rules, and we tend to postpone bottom paint removal in favor of spot prepping and feathering in the bad spots. At some point, it’s time to bite the bullet and tackle what’s been pushed down the road.
RELATED ARTICLES MORE FROM AUTHOR
On watch: this 60-year-old hinckley pilot 35 is also a working girl.
I did this job over two months late last year on my new-to-me Nor’West 33. I’ve sworn to leave boating before I ever do it again!
I had my 1982 Sea Sprite 34 “glass-blasted” several years ago. I was afraid that the glass would be too aggressive (no apparent blisters- just 30+ years of bottom paint flaking in a lot of places). The contractor was well-recommended (here in Maine), tented the boat from waterline down and under, operator in full air-supplied suit inside the tent, and did a fantastic job. In most all areas, the pre-existing barrier coat remained on the boat. The work was done on my property, so no boatyard rules to negotiate, but there was not a spec of residue left on site when the contractor was finished. I faired the very few gelcoat voids that were opened up by the blasting, as well as “battle scars”, then 4 coats of Interprotect, hard bottom paint over partially cured last coat of barrier, then two coats of ablative- 3 seasons later (with ablative renewals), no lifting or any other issues. Well-worth the expense!
In all situations where mechanically powered sanding is to be done, a high quality sander with very good dust collection is an investment within long term returns. But, it only works as well as the dust extractor–the vacuum attached. The options for the vacuum are either an expensive system with high dust collection efficiency and down to potential HEPA ratings with an upgraded HEPA filter. Or, the same performance is available with a shop vacuum and the addition disposable paper bag liners and an upgrade to the standard pleated filter to high-performance or HEPA-rated fllter, both at very reasonable costs.The noise and cfm perform are very comparable at a fraction of the cost of the aforementioned commercial dust extraction systems.
LEAVE A REPLY Cancel reply
Log in to leave a comment
Latest Videos

Super Shallow Draft Sailboat: The Leeboard Sharpie

Hans Christian 41T – Boat Review

Seven dead after superyacht sinks off Sicily. Was the crew at...

What’s the Best Sailboats for Beginners?
Latest sailboat review.

- Privacy Policy
- Do Not Sell My Personal Information
- Online Account Activation
- Privacy Manager
- CREATE AN ACCOUNT
- Boat Cover Finder
- Bimini Top Finder
- Boat Propeller Finder
- Engine Parts Finder
- Anchor & Dock
- Watersports
- Clothing and Footwear
- Engine Parts
- Cabin and Galley
- Covers and Biminis
- Electronics
- Paint and Maintenance
- Pumps and Plumbing
- Anchor Chains & Ropes
- Boat Fenders
- Boat Mooring
- Boat Protection
- Dock Storage & Protection
- Ladders, Steps, & Platforms
- Top Sellers

- Fishing Rods
- Fishing Reels
- Fishing Rod & Reel Combos
- Fishing Tools & Tackle Boxes
- Fishing Line
- Fly Fishing
- Fishing Bait & Fishing Lures
- Fishing Rod Holders & Storage Racks
- Fish Finders, Sounders & Sonar
- Trolling Motors
- Fishing Nets
- Fishing Downriggers & Acessories
- Fishing Outriggers & Acessories
- Fishing Kayaks
- Fish Cleaning Tables

- Inflatable Rafts
- Paddle Boarding
- Paddles & Oars
- Wakeboard, Wakesurf & Ski
- Wakeboard Towers
- Tow Ropes & Handles
- Life Jackets & PFDs
- Snow Sports
- Roof Racks, Carriers, Dollies

Men's Clothing
- Accessories
Men's Footwear
- Atheltic Shoes
- Water Shoes
Women's Clothing
- Dresses & Skirts
Women's Footwear
- Fuel Systems
- Sacrificial Anodes & Zincs
- Generator Parts
- Inflatable Boats
- Propeller Parts & Accessories
- Boat Manuals
- PWC Parts & Accessories

- Fishing Boat Seats
- Offshore Boat Seats
- Ski Boat Seats
- Pontoon Boat Seats & Furniture
- Boat Seat Pedestals & Hardware
- Boat Seats by Manufacturer
- Boat Tables & Hardware
- Boat Seat Covers
- Boat Seat Vinyl
- Floating Boat Cushions

- Barbeque Grills
- Boat Drink Holders
- Cabin Accessories & Hardware
- Boat Ventilation
- Interior & Cabin Lighting
- Marine Teak Products
- Carbon Monoxide & Smoke Detectors
- Binoculars & Telescopes

Boat Bimini Tops
- Bimini Top Accessories
- Pontoon Bimini Tops
- Other Biminis
- RV & Trailer Covers
- Boat Shrink Wrap & Accessories
- Boat Shelters
Boat Covers
- Boat Cover Accessories
- Boat Lift Canopy Covers
- Other Covers
- Boat Wiring & Cable
- Marine Batteries & Accessories
- Marine DC Power Plugs & Sockets
- Marine Electrical Meters
- Boat Lights
- Marine Electrical Panels & Circuit Breakers
- Power Packs & Jump Starters
- Marine Solar Power Accessories
- Marine Electrical Terminals
- Marine Fuse Blocks & Terminal Blocks
- Marine Switches
- Shore Power & AC Distribution

- Marine Audio & Video
- GPS Chartplotters & Accessories
- Electronic Navigation Charts & Software
- Digital Instruments
- Display Mounts
- VHF Radios & Communication
- Marine Radar
- Auto Pilot Systems
- Action Cameras

- Fiberglass & Epoxy Boat Repair
- Boat Paint & Varnish
- Marine Adhesives, Sealant, & Caulking
- Marine Engine Maintenance
- Boat Cleaners & Waxes
- Boat Cleaning Supplies

- Fresh Water Boat Systems
- Bilge Pumps
- Marine Plumbing Parts
- Wash Down Pumps
- Livewell Aerator Pumps & Live Bait Wells
- Toilet & Waste Pumps
- Marine Pump Replacement Parts

- Tires, Rims, & Hub Kits
- Boat Trailer Winches
- Boat Motor Supports & Transom Savers
- Boat Trailer Guides & Rollers
- Boat Trailer Fenders
- Boat Trailer Lights
- Boat Trailer Hardware
- Boat Trailer Jacks
- Boat Trailer Brakes & Axles
- Boat Trailer Tie Downs
- Couplers, Mounts, Hitches, & Locks

- Boat Deck Harware
- Marine Nuts, Bolts, & Screws
- Boat Handles, Pulls, & Rings
- Prop Nut Kits & Hardware
- Boat Cabin Hardware
- Marine Fasteners
- Boat Windshield Parts
- Boat Tubing & Rails
- Boat Mirrors
- Marine Tools & Tool Kits
- Boat Lettering

- Women's Clothing Deals
- Men's Clothing Deals
- Fishing Deals
- Anchor & Dock Deals
- Electrical Deals
- Electronics Deals
- Paint & Maintenance Deals
- Pumps & Plumbing Deals
- Boat Seats Deals
- Trailering Deals
- Camping & RV Deals
- Dealer Login

- Forums Login

- Search forums
- The iboats forum moderators would like to mention to all the iboaters here that we’re sorry but the website server seems to be running on half a cylinder and in order to post pictures, etc. you may have to use an outside hosting source, which we understand is not ideal, but its all we got at present. We are hoping that the administration can rectify this issue soon, but unfortunately at this time we can make no promises as to when... we have been working on letting the higher powers that be 'know of the situation... hang in there iboaters, we've been through a lot over the years and this is just another rough weather system rolling through to endure is all. Thank you.
- Boat Repair and Restoration
- Boat Restoration, Building, and Hull Repair
Bottom paint removal to original gel coat finish
- Thread starter John Scott
- Start date Apr 10, 2014
- Apr 10, 2014
I am considering the purchase of a new boat where the owner got carried away with the bottom paint and painted way above the water line, ie. above the bow eye???? Having never owned a boat with bottom paint, is it possible to remove the excess bottom paint down to the gel coat in these areas and restore the gel coat to it's original luster so it doesn't look obvious. If so, are there any hints on how to do this. I'm pretty handy and tackle most repair jobs myself. Any suggestions will be greatly appreciated. Thanks.

- Apr 11, 2014
John Scott said: I am considering the purchase of a new boat where the owner got carried away with the bottom paint and painted way above the water line, ie. above the bow eye???? Having never owned a boat with bottom paint, is it possible to remove the excess bottom paint down to the gel coat in these areas and restore the gel coat to it's original luster so it doesn't look obvious. If so, are there any hints on how to do this. I'm pretty handy and tackle most repair jobs myself. Any suggestions will be greatly appreciated. Thanks. Click to expand...

Vice Admiral
Bondo said: Ayuh,.... Welcome Aboard,.... Look into Soda Blastin ',.... It's harsh enough to remove the paint, yet soft enough to leave the gelcoat,.... Click to expand...
- Shopping Cart
- Your shopping cart is empty!
- Bottom Paint Remover
Bottom Paint Stripper is a newly developed, superior and safer type of marine paint remover. Remove Over 10 Layers of Paint in Just One Application!
Refine Search
Marine paint stripper gallon.
Click Here for Sea Hawk Marine Stripper Technical Data Sheet Click Here for Sea Hawk Marine Stripper Safety Data Sheet .....
Marine Paint Stripper 5 Gallon Pail
Click Here for Sea Hawk Marine Stripper Technical Data Sheet Click Here for Sea Hawk Marine Stripper Safety Da.....
View Special Offers!
- Gift Vouchers
- Order History
IMAGES
VIDEO
COMMENTS
Chemical Boat Bottom Paint Strippers. Rather than using soda blasting or sanding, many marinas prefer to chemically remove bottom paint. The chief advantage in chemical stripping is better control over environmental hazards, particularly toxic dust and noise. Chemical stripping is also the simplest of stripping methods, requiring skill with only a paintbrush and a scraper-provided that you ...
Let's Get to Bottom Painting Your Boat ! I offer a lot of helpful tips in this how to video. Orbital Sander - (I've used a lot of different ones and this is...
Strip Away, Marine Development & Research Corp., 2116 Merrick Ave., Suite 4001, Merrick, NY 11566; 516/546-1162. West Marine, PO Box 50070, Watsonville, CA 95077-0070; 800/262-8464. Darrell Nicholson. Practical Sailor has been independently testing and reporting on sailboats and sailing gear for more than 50 years.
Easiest Way to Remove Bottom Paint from a Fiberglass Boat: DIY TutorialAre you tired of spending hours sanding to remove bottom paint from your fiberglass bo...
In this video I use a chemical stripper in conjunction with dry and wet sanding to remove old anti-fouling paint from the hull of our boat.
Most boatyards in the United States have strict rules about how bottom jobs are done and may require a ground cover or a tent around the boat from the waterline down to capture the dust and debris. A quicker way to remove many layers of paint is through high-pressure blasting with either soda, sand, or a special glass material shot at the hull.
1. Holding the scraper close and using body weight to apply downward pressure helps prevent arm fatigue and joint injury. Spring is just around the corner. For many sailors, especially those with boats on the hard, it's good time to consider the advantages of stripping off years of old paint. Bottom paint can begin to lose adhesion after as ...
Selecting the Appropriate Grit Sandpaper: Start with a coarse grit sandpaper (around 80-100) to remove the majority of the paint. Then, gradually progress to finer grits (120-220) for a smoother finish. Techniques for Effective Sanding: Use long, even strokes to sand the surface, applying consistent pressure.
Now get to work! First, lay out a large tarp or dropcloth to cover the entire work area. Knock off any loose paint with a scraper and, using either a sanding block or a dustless DA sander, lightly sand the entire bottom with 80-grit sandpaper. Spend a little extra time on any high or uneven areas.
Soy strippers I experimented with several approaches to remove ancient bottom paint from our small boat, including sanding, scraping and strippers, and I got the best results with least effort by using a soy-based stripper (eg Boat-Brite, Franmar Soy-Strip).The stuff has low toxicity, a long working time, and is water-soluble.
Oct 22, 2008. 3,502. - Telstar 28 Buzzards Bay. Apr 28, 2009. #4. Tim—. It is more likely that the boat was painted with an ablative paint. A pressure washer, properly used, will strip ablative paint like nothing else.. A pressure washer won't even annoy, much less remove, a hard epoxy paint if the surface was properly prepped.
Concentrate the mixture to get a sparkling clean fiberglass boat bottom. Then connect a hose to both ends of the air compressor: a supply of compressed air and a drain hose. Put on your protection gear-respirator and earplugs. Point your soda blaster toward the boat's exterior and blast away, revealing a clean hull.
This will make it easier for you to stir the paint thoroughly. Do not thin bottom paint or it will lose its antifouling effectiveness. Use a solvent-resistant brush or 3/8" nap roller to apply paint thickly, without drips, onto the hull. Keep the thickness even, and paint from one end of the boat to the other.
Dec 30, 2019. #1. Hello all, and wishing everyone a happy and healthy 2020! I do have a question also concerning bottom paint removal. We bought Maxine new in 2008 and immediately applied 2 coats of barrier coat before the first bottom paint. Since then we have applied a thin coat of Petit Trinidad SR each Spring.
If I'm going to get my boat launched and up to Maryland to finish the interior, I need to get the bottom done. I'm thinking about doing Copper Coat or someth...
A chemical paint stripper is another way to remove paint buildup and is the method of choice for some boatyards since there's no dust or noise and the residue can easily be contained. Paint stripper is relatively easy to use—you brush it on with a paintbrush, wait the recommended time, then remove the resulting goo with a scraper—but it ...
Ways to Remove Boat Bottom Paint. Steps for Plastic + Stripper Method. 1. Paint the stripper onto the hull. 2. As you paint, lay the plastic sheet covers on the areas you've finished. 3. Wait an entire day then peel the plastic back, then start scraping. Guide for Scraper Only + Stripper Technique.
Next comes the all-important apportionment of easy versus difficult paint removal. In this case, 85 percent falls into the tough-going regime that equates to four minutes of toil per square foot (0.85 x 360 x 4 = 1,224 minutes of misery). Add in the easy scraping (0.15 x 360 x 0.5 = 27 minutes), and the result is 1,251 minutes, or just under 21 ...
Having never owned a boat with bottom paint, is it possible to remove the excess bottom paint down to the gel coat in these areas and restore the gel coat to it's original luster so it doesn't look obvious. If so, are there any hints on how to do this. I'm pretty handy and tackle most repair jobs myself. Any suggestions will be greatly appreciated.
In this video, I use a combination of TotalBoat TotalStrip Stripper and Soda Blasting to remove the Bottom Paint from my Boston Whaler Dauntless. It's along ...
Bottom Paint Remover - Bottom Paint Stripper is a newly developed, superior and safer type of marine paint remover ... Boat Bottom Paint. Top Performing Bottom Paint; Self Polishing Ablative Bottom Paint; ... Remove Over 10 Layers of Paint in Just One Application! Refine Search. List Grid. Product Compare (0) Sort By: Show: Marine Paint ...
Stripping boat paint, especially bottom paint; Heat Gun? Stripper? sandblasting? Scraping? Chemical Stripper? grinding? This video is about removing old bott...
Renovation of a Classic 1973 Egg Harbor Sportfish boat. Project overviews in this episode include: removal of the bottom paint, repainting the bootstripe and...