Jenna Rainey

CEO + ARTIST + EDUCATOR


hey friend!
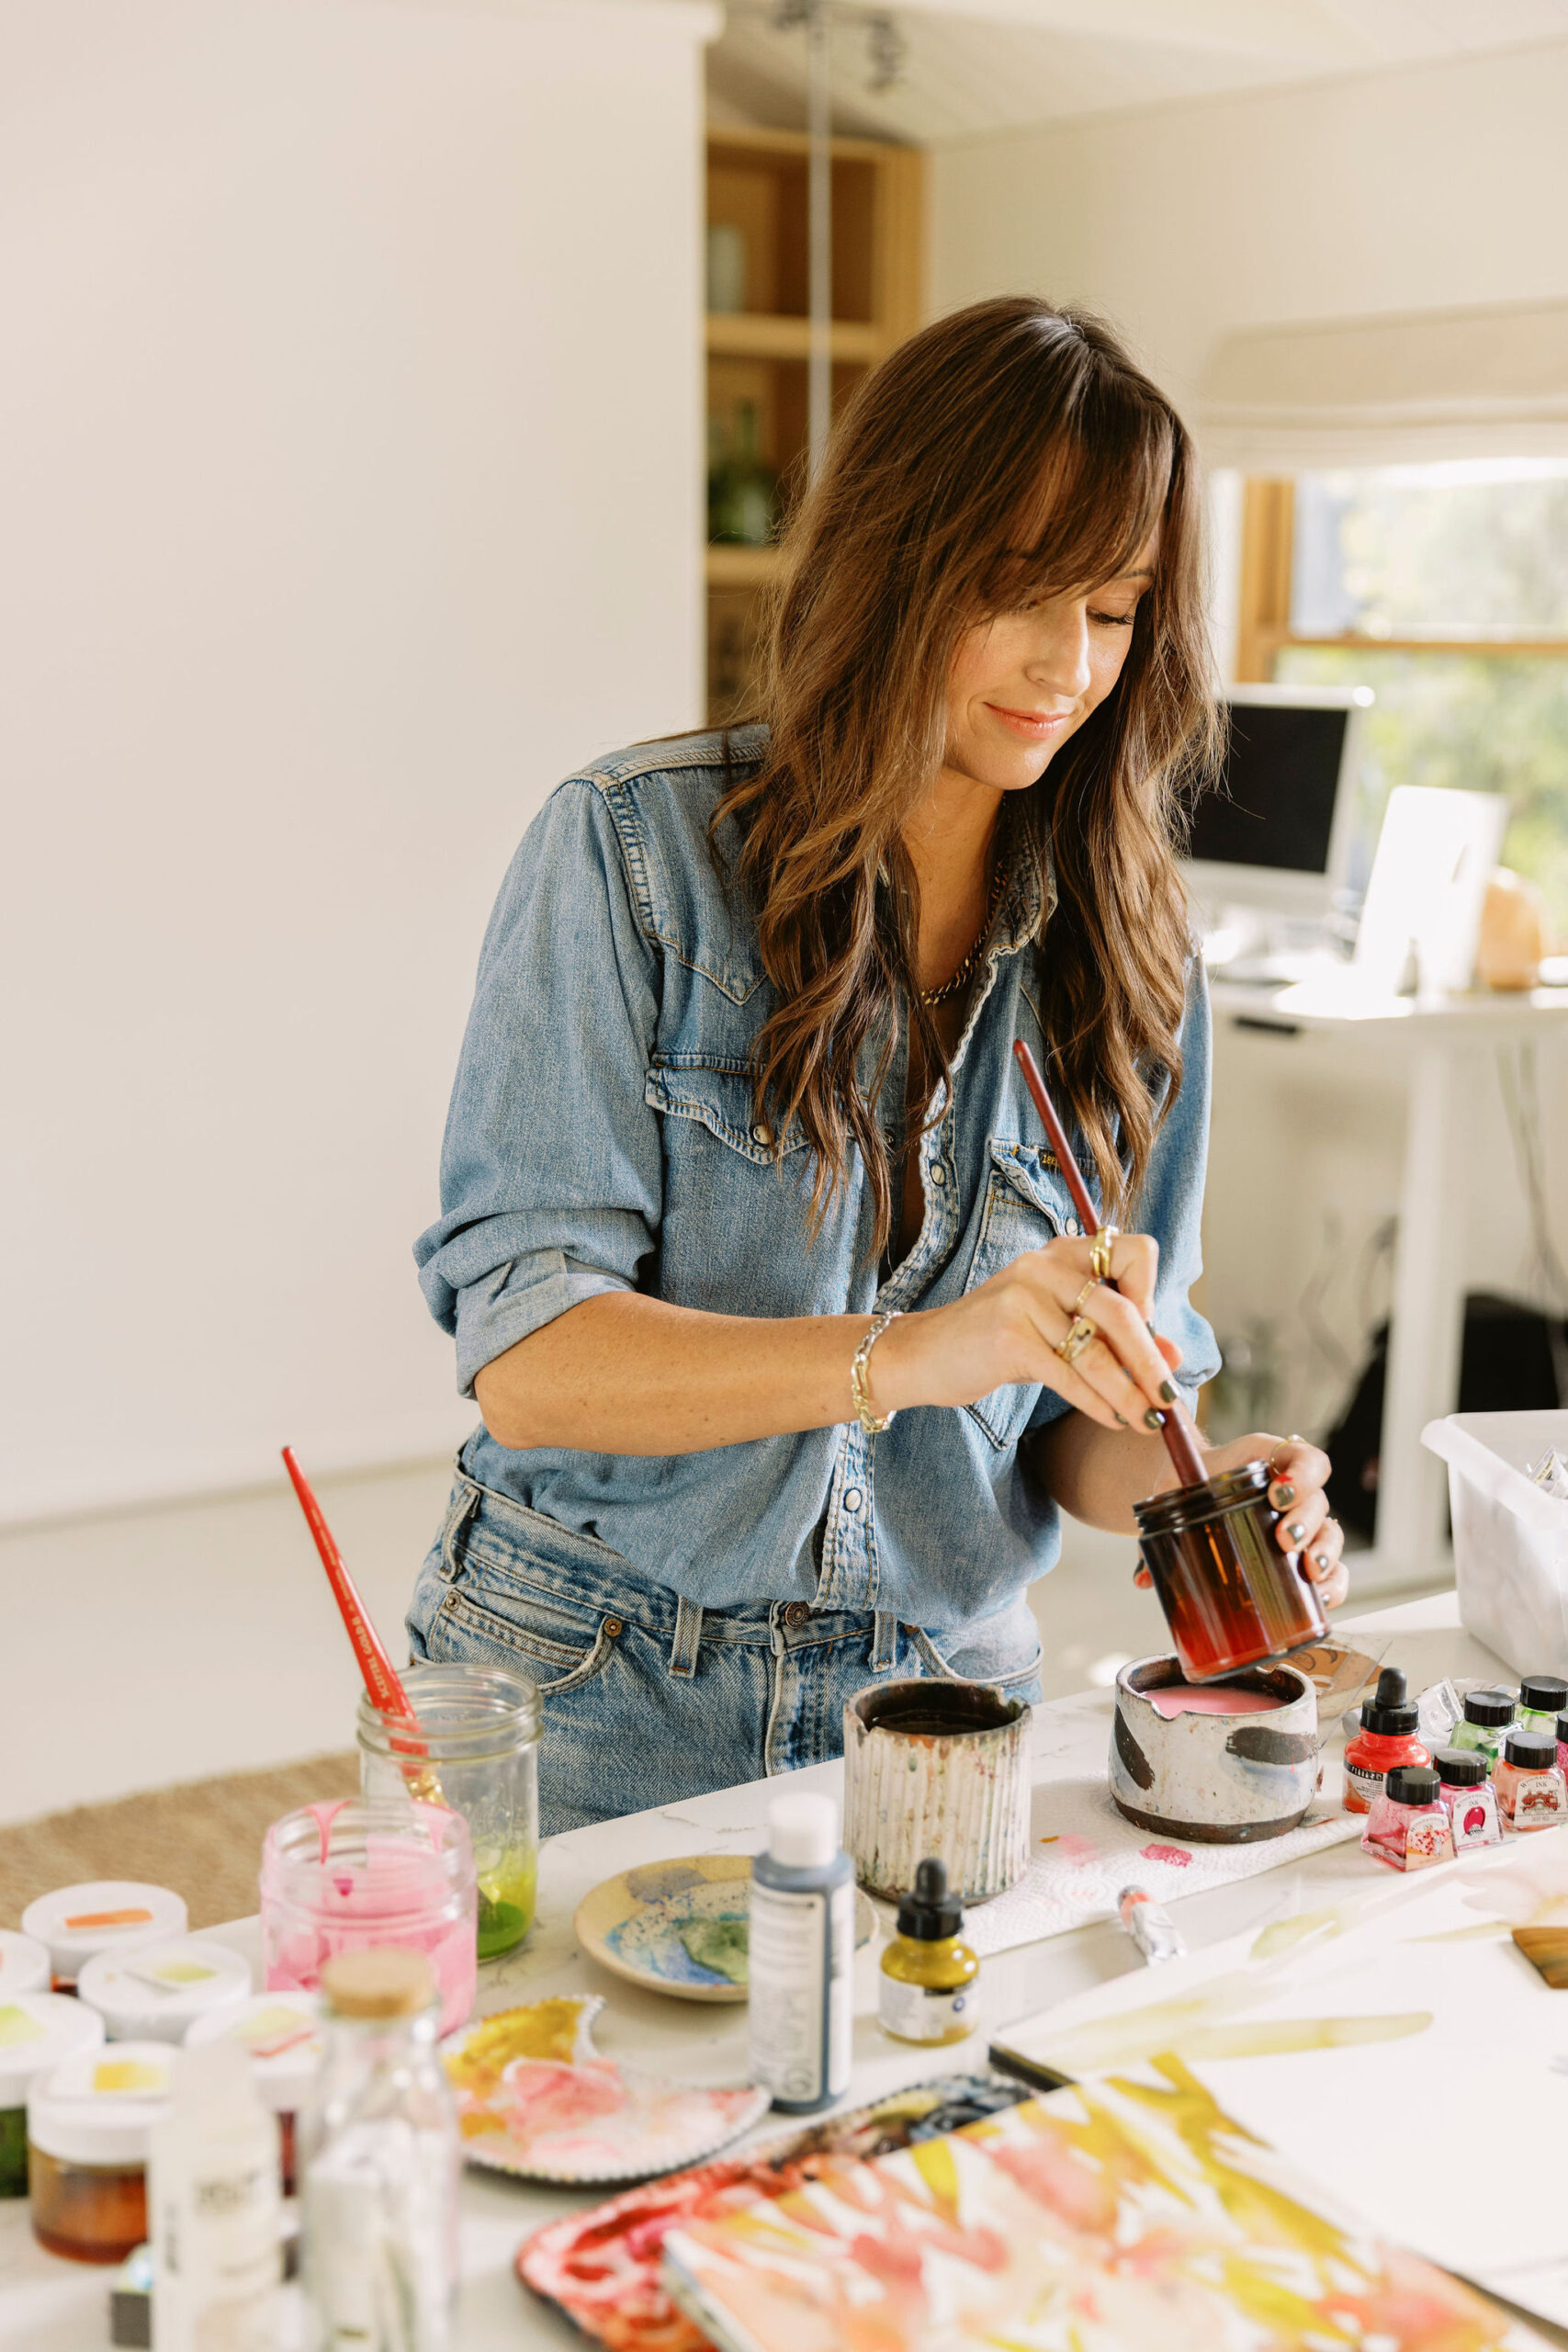
I’m jenna rainey. , i'm an artist, self-taught designer, and multi-faceted creative entrepreneur who is hell-bent on teaching everyone how to find their inner creative voice..
My favorite supplies
A highly creative nerd with a unique breed of humor and the proud earner of a self-bestowed award for being the world’s most curious and driven human.

Hey I'm Jenna!
Hang out on youtube, it’s like netflix-binging bob ross videos, but with a dose of dry + quirky humor and fewer happy little tree references. .

Wanna Learn Watercolor ?
i wrote some books

Master Watercolor magic
GRAB THE FREE GUIDE

Watercolor Sailboat
Jenna .
This week, I'm teaching you how to paint a quick and easy watercolor sailboat landscape!
When I don't have a lot of time or I just want to play with colors and basic shapes, I paint loose-style. It's just whimsical and fun!
This watercolor sailboat takes less than 10 minutes to paint but includes simple techniques to inspire and spark creativity. This is a great tutorial for beginners, too!
Watercolor Sailboat Step by Step
00:00 – Intro. 00:32 – Color mixing. 01:06 – Painting the sail boat. 02:16 – Painting waves. 03:01 – Painting trees and background. 04:53 – Painting the sky. 06:14 – My thoughts on the painting. 06:51 – YOUR thoughts?
Links & Freebies
Get access to all my favorite art supplies and business tools here. My Amazon storefront with supplies and other random things I love. My Spotify painting playlist My Floral Watercolor E-book My Calligraphy E-book
Related videos
Complete Beginner's Guide to Watercolor Complete Beginner's Guide to Watercolor: Top Questions Answered Complete Beginner's Guide to Watercolor Flowers Watercolor Techniques: Wet-on-Wet Watercolor Techniques: Wet-on-Dry 10 Tips to Improve Watercolor
… and for even more tutorials, subscribe to my YouTube channel!
Patreon Community
Join my Patreon community! You have a variety of fun options to choose from like:
- Watch my YouTube tutorials ad-free
- Get early access to the tutorials before they're released on YouTube
- Patreon-exclusive tutorials
Head on over to Patreon to get all the fun details.
by Jenna Rainey
+ show Comments
- Hide Comments
add a comment
Leave a Reply Cancel reply
Your email address will not be published. Required fields are marked *

Browse By Category
art + creativity
So Hot Right Now
Organizing Your Art Space: Tips from an Artist

Starting a New Hobby as an Adult

The Joy of Experimentation: How to Express Yourself Through Different Art Mediums

Art and Meditation: 3 Ways You Can Use Art to Enhance Your Meditation Practice

Exploring Abstract Art for Beginner Watercolor Painters

The Connection Between Art and Mental Health
back to blog home
Previous Post
« How to Map Out Your Content Calendar
“Should I Have a Blog?” Reasons Why Blogs Are Important »

The Complete Beginner's Guide to Watercolor
Get a rundown of all my recommended supplies, learn fundamental techniques and tips including color theory and composition, and walk away feeling super confident with your new love of watercolor!

Free e-book
Kickstart your art practice!
*signing up will subscribe you to our email list, you may unsubscribe at any time, though doing so means we cannot contact you with more free, valuable education and tips on this topic. you also agree to our terms and conditions and privacy policy ., an artist, self-taught designer, and multi-faceted creative entrepreneur who is hell-bent on teaching everyone how to find their inner creative voice., i'm jenna rainey..

Customer Support
YOU'VE GOT MAIL!
back to the top

Read the blog
watch me on youtube
my art community
art retreats
everyday watercolor books
licensing resources + tips
The Ceo advice column
Customer service
program login
community login
contact us!
© 2018-2024 JENNA RAINEY LLC | TERMS & CONDITIONS | PRIVACY POLICY | SITE CREDIT

@JENNARAINEY
- How to paint a boat: A step-by-step guide
Painting your boat not only enhances its visual appeal but also protects it from the damaging effects of saltwater, sunlight, and other elements. Whether you have a sailboat, powerboat, or kayak, the principles of boat painting remain largely the same.
Assessing your boat's condition
Before you begin, evaluate your boat's current condition. Inspect the hull for any damage, scratches, or rust that may need to be addressed before painting. Make a list of necessary repairs and tackle them first.
Gathering the right tools and materials
To paint your boat successfully, you'll need a range of tools and materials, including paintbrushes, rollers, sandpaper, masking tape, drop cloths, and, most importantly, the appropriate marine paint.
Preparing the boat surface
Proper preparation is the key to a successful paint job. Start by cleaning the boat's surface thoroughly to remove dirt, grease, and old paint. Sand the surface to create a smooth and clean canvas for the new paint to adhere to.
Applying primer
Priming is a crucial step to ensure good paint adhesion and durability. Apply a marine-grade primer that is compatible with the paint you've chosen. Allow it to dry thoroughly as per the manufacturer's instructions.
Read our top notch articles on topics such as sailing, sailing tips and destinations in our Magazine .
A man taking care of his ship.
Check out our latest sailing content:
Choosing the right paint.
Selecting the right type of marine paint is essential. There are different types of boat paint available, such as antifouling paint, topside paint, and bottom paint. Choose the one that suits your boat's needs and your intended use.
Applying the paint
Start by applying the paint to the boat's surface using a paintbrush or roller. Use long, even strokes, working from one end to the other. Be mindful of the weather conditions, as extreme temperatures and humidity can affect the paint's drying process.
Applying additional coats
For best results, you may need to apply multiple coats of paint. Follow the manufacturer's recommendations for drying times between coats. Applying multiple thin coats is often better than one thick coat.
Drying and curing
Allow the paint to dry completely before launching your boat into the water. The curing time can vary depending on the type of paint and environmental conditions. Follow the paint manufacturer's instructions for specific guidance.
Final touches and cleanup
After the paint has dried, remove any masking tape and clean your tools and equipment. Inspect your boat's finish for any imperfections, and make any necessary touch-ups.
Painting a boat requires careful planning, preparation, and attention to detail, but the results can be incredibly rewarding. Not only will your boat look like new, but it will also be better protected against the elements, ensuring many more enjoyable days on the water.
Whether you're a DIY enthusiast or a boat owner looking to maintain your vessel's beauty and functionality, this step-by-step guide on how to paint a boat will help you achieve a professional and long-lasting finish. So, roll up your sleeves, gather your materials, and give your boat the makeover it deserves. Happy painting!
So what are you waiting for? Take a look at our range of charter boats and head to some of our favourite sailing destinations.
I am ready to help you with booking a boat for your dream vacation. Contact me.

Denisa Nguyenová
- Start Here!
- Art Tutorials
- Art Lessons
Art Supplies
- Shopping Cart

How to Paint a Sailboat Watercolor Painting Tutorial
Sailing is one of my favorite things to do and painting sailboats is almost as fun! This lovely sailboat flew in the wind on Somes Sound on Mount Desert Island, Maine. It was one of those perfect sailing days. The light sparkled, the wind blew steadily and the last of summer heated the air. Since I didn't have a sailboat there, I sketched and took photos of the sailboats moving up and down the Sound.
The shimmering water is the tricky part of this painting. It's a great opportunity to practice your dry brush! This painting needs rough press paper to get that sparkling water. The rest of the painting is simple. Trees in the distance and a pared down palette. Keep the colors and your brush strokes simple. Sailing at its finest on a summer day in Maine!

Painting Tutorial Level
Skill Building
M. Graham watercolors
Painting Demonstration 1

Always sketch very lightly in watercolor since most pencil lines will show. You want the focus on the painting, not the drawing. Unless, of course, you're highlighting the pencil lines!

Since I'm painting a light object with a lot of brushstrokes around it (for the water) I can either mask it out, preserve highlights with wax or use white gouache. I decide on a combination of the last two since they feel more spontaneous than masking and I don't have too many bright highlights.
When you use a wax crayon, always remember it's there for better or worse. It will not come off and leave paper the same!
Disclaimer: Jennifer Branch Gallery is a participant in the Amazon Services LLC Associates Program, an affiliate advertising program designed to provide a means for sites to earn advertising fees by advertising and linking to amazon.com. I receive a small rebate for your entire order (starting at 4%) if you choose to purchase through Amazon. Most items can be bought multiple places and I highly recommend local art stores if you have one! Any other recommendation links I receive no compensation for. These referrals help me support this website, and I thank you for any purchase you make through them. I will never recommend a product I have not used frequently and believe is the best tool for the purpose!
Painting Demonstration 2

I want barely there water sparkling in the background. Very pale highlights and dark shadows, so dry brush is the solution! Dry brush and texture is why I chose the rough press paper, after all.
With a tricky dry brush where every stroke shows, I like to test the brush a few times on an area of the painting that isn't quite so tricky or a scrap of paper. As you can see, I got the texture just right in the trees at the upper part of the painting. Some extra texture there is perfect and it will be dark enough the individual strokes don't show.
Since all those strokes show up in the water, make them count! Move your brush with the waves. Notice how highlights show up in horizontal swathes across the water. Work with the water, not against it.
A squirrel hair brush is perfect for hit and miss dry brush like this. It barely touches the ridges of the paper so you can really get that sparkle!

Painting Demonstration 3

Since this is dry brush, there's no time between washes! I continue moving around the painting, using slightly varying blues and values. This gives me that great water shimmer! If some of the dry brush hits a still wet area, great! that gives a natural feeling variation.
I still keep everything light in value in this wash. I don't want thick sludgy paint, but effervescent sparkle!
Artist Tips

Painting Demonstration 4

Now that dark background! I want a bit of a a golden glow, but subtle instead of harsh so I use quinacridone gold. This is one of the few paintings I never use a yellow in!
I paint a loose wet brush on dry paper wash of the gold, then drop in pthalocyanine green. I'm keeping it loose since the background is not the focus, the sailboat is!
The reflection of the sailboat is also a golden glow in the water, so I use quinacridone gold again. I'm still painting dry brush since I want the water to sparkle there too, not be dulled. The reflection is also a shadow which makes it quite complicated to paint.
Painting Demonstration 5

Now it's time to turn the golden green into hazy rich darks. While it's drying, I move maroon perylene into the trees to darken them. The rich red helps with the strong, clear color. Then I scrabble in ultramarine blue to make the trees green again. Finally, I add cobalt blue for the slightly opaque haze.
I dash quinacridone dry brush on the wooden mast. A bit of ultramarine blue and pthalo green gives shape to the boat.
Painting Demonstration 6

After the painting has dried completely, I start on the sail. The gorgeous sail is really the star of the painting so it's fun to finally start painting it! Still, it has to be kept simple since there really isn't much to the sail. Quinacridone gold gives the faint glow of the reflecting sun.
I continue adding texture and color to the waves. I need strong darks to balance out the background trees.
I keep a light hand on the waves since the lovely shimmering could be destroyed with a few strokes too many!
Painting Demonstration 7

The last stage is the details and it's hard to keep them from getting too fussy!
I continue the details on the sail. I use the top mainsail reinforcement as an excuse to dull down the arrow pointing the viewer out of the painting!
To purchase How to Paint a Sailboat original watercolor painting, please click!
How to Paint a Sailboat Final Watercolor Painting!
Related Art Lessons

- Painting Galleries
- Latitude Pens
- Contact Me!
All Paintings, Images, Videos, Text and Website Design Copyright 2022 by Jennifer Branch. All Rights Reserved. No Image, Video, Text or Website Design may be used without my written, specific permission.
Michele Clamp Art
Watercolor paintings, tutorials, and videos
Watercolor Boat Painting Tutorial

Want to paint this watercolor boat painting? Follow the step by step instructions (including video at the end) and see how easy this can be!
I just can’t resist painting boats in watercolor. The colors, the details, the sun and shadow – all come together to make painting these watercolor boats so much fun. In this watercolor boat tutorial I break down all the steps and show you how you can paint this scene. Boat watercolor paintings can seem daunting but if you take things slowly it’s amazing how they come together.
Sign up for updates on classes and free livestreams
Watercolor materials needed.
- Mechanical pencil
- Watercolor paper (I like Fabriano Artistco 140lb cold press)
- Permanent rose
- Vermillion/pyrrole red/naphthol red
- Ultramarine blue
- Cobalt blue/cerulean blue
- Yellow ochre
- Lemon yellow
- Burnt Sienna
- Value Scale
- Color isolator
- Palette/paper towels/water pot
- Small spray bottle of water
Watercolor Boat Drawing

The drawing for this painting is pretty important. Sometimes I won’t put much detail into a drawing and just indicate the main shapes. For instance a landscape with trees can be pretty sparse in the drawing. All the detail and texture goes in by eye with just paint. But for this scene there is a lot going on and we want to indicate the position of a lot of different things.
Using a Grid Helps With Drawing Accuracy
I did this drawing by eye but, if you’re not confident with your drawing, you can grid up your paper lightly with pencil and draw it square by square. That way you can be sure you’re getting everything in the right place. It’s not a foolproof method but it gives you far less room for error. I’ve included a gridded up version of the reference below.

The aspect ratio of the photo is the same as for a 10″x14″ piece of watercolor paper. If you mark your paper into quarters on each side and join them up to make a 4×4 grid you can transfer the drawing more easily onto your paper.
Take Some Time to Make a Plan for Your Painting
Before we dive into the painting it always helps to take a few minutes and plan out what you’re going to do. It can be hard to do this – we want to jump straight in and get those brushes moving and paint splashing around. But a few minutes thought at the start always makes for a better painting. We can spot possible problem areas and make sure we know roughly how we’re going to proceed.
Which Direction is the Light Coming From?
I first make note of where the light is coming from and where the shadows fall. In this case the sun is on our right and the shadows are falling on the left. This is always good to keep in the back of your mind. If the reference is unclear in some areas you can work out how the lights and darks should fall even if you can’t make it out from the photo.
Where are the Lights and Darks?
The next thing I do is note where my lightest lights are and my darkest darks. Once we’ve located these then we know that everything else has to fall somewhere between those areas. In this case our lightest light is the white hull on the left boat. The darkest darks are in the shadow underneath the boats and possibly inside the cabins. I keep this in mind. Nothing else can be darker or lighter than these areas.
Where are the Main Shapes and Values?
This one is trickier but it pays off giving it some thought. Even though there’s a lot of detail going on in this photo I like to break it down into 4 or 5 main value shapes. In this case I would estimate (or measure using our value scale) the value of the following areas
- The hulls of the boats (in light and shadow)
- The cabins of the boats (in light and shadow)
This may seem like a lot to work out ahead of time but getting those big value shapes right is an enormous help getting a scene to hang together and getting it to be convincing.
Identify a Few of the Colors

Doing some test mixes of a few of the main colors can also be a good idea. It’s much easier to do this before the painting. When you’re in the middle of the painting there’s so much going on it’s hard to stop and think about this. It’s a bit like prepping for a recipe. Getting all the ingredients measured out ready ahead of time makes putting a meal together much easier. (Not that I ever really do that – but I should!) In this painting I mixed as I went along but it’s a better idea to try out your color mixes at the start. If you think you can’t remember how you mixed your colors then putting a pencil note next to the swatch is a good idea. It’s doesn’t have to be anything complicated – just a list of the colors is enough.
Watercolor Boat Painting – Finally we Paint!

So let’s start painting. We’re going to paint this in layers and build up the painting from light to dark. We’re first going to block in all the shapes with their lightest colors. Once those are dry we can go back in and add in the darks. This way of working takes a bit of getting used to. As we’re starting with the light colors of all the shapes things won’t start to look three dimensional until quite late on in the painting.

I have many more step-by-step tutorials and videos!
We want things to look flat to start with..
If we put in too much value variation in the early stages then the darks won’t make as much impact when we put those in. In these early stages try and match the color and value as best you can to the reference. And, most importantly, keep these early washes even. Don’t be tempted to try and make things look right at this stage. It takes a bit of faith but once you get used to it it will all make sense.
Keep Going With the Light Values

Keep going across all of the main shapes of the boats. One thing to remember is that we’re putting in the light value of each different shape but these values may vary from shape to shape. For instance, the hull of the red boat is a bright orange-red in the light. The actual value of this is around a 5 i.e. mid-way down the value scale. If we compare this to the beige area above we can see that it’s a little darker. The beige area in the light is around a 7 but it’s still in the light.
Similarly the red stripe on the left hand boat is around a 4 (i.e. darker than a mid-value) in the light. If you have a value scale and a printout of the reference you can measure the values directly. If the color is distracting (and it can be with bright colors like these) squint your eyes and it becomes easier to judge value.
Use the ChromaMagic Tool to Measure Color

Alternatively you can load up the reference in ChromaMagic and click on different areas. It will show you the three components of the color – hue, value and chroma. The color notation is part of the Munsell way of measuring color. It is incredibly useful in painting and makes color very straightforward to analyze.
Paint in the Sea in the Background

The sea in the background goes in next. This is a fairly dark blue and helps to tie the boats in the scene and give us some depth.
As you can see at this point the painting isn’t looking three-dimensional. Don’t panic! This is exactly how it should be looking at this point.
Paint in the Sand Around Your Watercolor Boats

Next we’re going to put in the sand. I really like this bit as we get to put in some texture with our spray bottle. One thing to be careful of – sand isn’t yellow. Or rather it is yellow but a very grayed out low chroma yellow. In this scene it’s a kind of beige so make sure you add in some black to your mix to take out some of the brightness. I’ve made the mistake of painting sand far too bright in color many times. Again mixing a swatch of color beforehand helps a lot as does using ChromaMagic for checking the chroma.
Use a Spray Bottle to Add Texture
While your sand wash is still wet take a spray bottle of water and lightly spritz the surface. If the paper is the right level of dampness the water will add small sparkles and splodges in the paint. It adds some interest and texture to the foreground. This can take a bit of practice to get right. If the paper is too wet the water will just disperse and disappear. If the paper is too dry the water won’t do anything at all.
Watercolor Boat Painting – Add the Sky

Note: I’ve got the order slightly wrong here. I’ve already put in some of the darks on the boats before doing the sky. The order doesn’t really matter. You can put in the sky before the shadows and everything should work out fine.
Let’s put in some sky now. The reference photo doesn’t really have much in the way of clouds and I didn’t really want a big expanse of blue up there. So I’ve invented some cloud shapes. You have a lot of freedom here. Put in some blue around wherever you fancy the clouds to be. While the paint is wet take a clean (very clean) damp brush and soften the edges of the clouds. The blue pigment will diffuse out into the damp areas of paper making lovely soft and convinving clouds.
Watercolor Boat Painting – Second Layer Darks

Now this bit is where the painting starts to come to life. We’re going to put in the shadow sides of the objects and make them look three-dimensional. Adding in these contrasting areas also helps the visual impact of the scene and it will make the image more interesting as well as more realistic.
Don’t Add Color in the Light!
We’ve already painted in the light sides of our objects so we won’t be putting any color in there at all. We’re just going to paint in the shadow colors on mostly the left sides. Make sure your colors are at least a couple of shades darker than your light sides and things will start to take shape. When you get to the insides of the cabins we’re even darker as very little light is getting in there – you don’t need to paint things – just a few dark shapes at different angles will suggest a lot of detail.
Be careful with the shadow on the white hull. We don’t want to go too dark here and keeping that shadow light will really suggest strong sun.
Add a Cast Shadow to Anchor the Boats to the Ground
Finally add some cast shadows on the sand and right at the bottom of the boats. This will make the boats convincingly anchored to the ground.
The Magic Bit – Details on Your Watercolor Boat Painting

By this point you should have something that’s looking pretty three-dimensional. This next bit really adds sparkle and interest to your watercolor boat painting! We’re going to put in some lovely details. Put in the masts and rigging with a small synthetic brush. Make sure they’re not too dark – a mid value gray is plenty dark enough here. The other thing to take care with is not to make your lines too continuous. Leave a few gaps here and there as it will make the masts more convincing than if you carefully paint them in one continuous line.

Continue with the masts and smaller details. Add in a few lines for the railings and the ropes holding the buoys. A few light lines on the white hull will also suggest their structure. I hope everything is looking really good by now!
Flags and Signs

We’re right at the end now. A few red marks for the flags will add a pop of color. The signs on the boat go in with an almost black background. The lettering is suggested with a little opaque white.
Final Thoughts on This Watercolor Boat Painting
If you tried this painting I hope it turned out well. I would love to see your results – please feel free to send them to me. I have also videoed the whole process and you can paint along with the full painting.

2 thoughts on “ Watercolor Boat Painting Tutorial ”
Hi Michele, Kathy Martinez here. I am working with the ColorMagic tool. Love it except for one problem I am having. My monitor is a Cintiq 32 inch display that I have supposedly color corrected with an i1 display gizmo. The colors for the Munsell chips from
Kathy your program don’t come through to match my big book Munsell chips. It is way off. My cintiq screen pretty matches my Ipad. Do you have any suggestions? I have just been finding the chip I have that matches the color swatches from ColorMagic, even though they aren’t the same as described in the program.
Hi Kathy – I replied by email. I was thinking that it may well be hard to match chips directly to the screen. I’m going to try with a setup that I know the colors off and see how it goes. ColorMagic will report the colors in the photo accurately but whether you can match to the display directly may not be possible. Screens give out light and chips only reflect the light so comparing them side by side is going to make the chips always look dark. But maybe there’s something else going on! We’ll see. If it’s fixable we’ll fix it.
Comments are closed.
- BOAT OF THE YEAR
- Newsletters
- Sailboat Reviews
- Boating Safety
- Sails and Rigging
- Maintenance
- Sailing Totem
- Sailor & Galley
- Living Aboard
- Destinations
- Gear & Electronics
- Charter Resources
- Ultimate Boat Giveaway
How to Paint Sailboat Decks
- By Tom Zydler
- Updated: March 14, 2013
Painting a sailboat
Janet Van Leuwen and Steve Van Wig own a Whitby 42. Looking at their beautiful, well-groomed ketch, you’d never guess it was built in 1982. The name on the stern, Lunacy , may be the only hint of the incredible amount of work that the couple has put into rejuvenating their boat. Bringing the decks and the coachroof top to their present glory was a large part of the project, as these tasks would’ve been on any glass boat more than 25 years old. This is how they did it. And frankly, this is how it should be done.
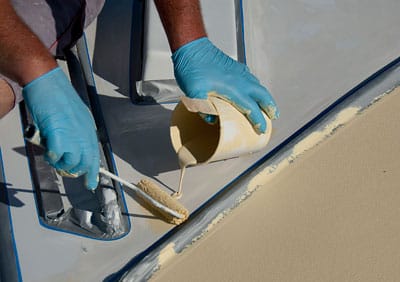
Before the couple could begin doing any prep work for painting, the deck hardware had to be removed. They needed access to tight spaces where the horizontal deck surface turned into vertical bulwarks, around the masts’ partners, near the windlass base, and so on. (They also removed the chainplates, which needed attention as a separate project.) Out came all stanchions, their bases, various padeyes, winches—anything and everything, in fact, that could obstruct the power sanders required to remove the worn-down, cracking, original nonskid pattern. Steve then used silicon sealant to plug all the fastener holes that would be reused; silicon repels paint, so the fastener locations would be visible when they began reinstalling the hardware.
Donning breathing masks and kneepads, the couple spent days grinding the old surfaces with 80-grit discs. Using thick foam pads on machines running at high rpm prevented any gouging in the laminate. Smaller sanders (both round and square) helped them to negotiate tight turns; at times, they resorted to manual sanding blocks. Working with thickened polyester and epoxy resins, Steve filled several hairline cracks and dings. They then sanded this filler with 80-grit, then 100-grit, and finally 120-grit sandpaper to achieve a smoother surface before vacuuming up all the accumulated dust.
Next, to keep paint drips off teak handrails, the windlass, and the portholes, they masked these with heavy paper and tape. Right after the final wipe with a cleaning solvent, they took two days to roll and brush on two coats of epoxy primer, the base for the final topcoat. Over the next few days, the primed surfaces were sanded with 120-grit paper, followed again by vacuuming and hosing the resulting dust. Afterward, Janet cleaned all the surfaces with non-sticky tack cloths designed for multipart polyurethanes.

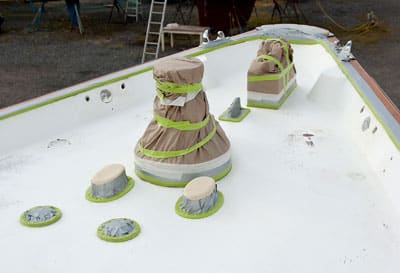
At this juncture, Steve identified and outlined the future nonskid areas, then spent a couple of days taping their inner edges with long-life 3M masking tape. At the corners, joining short lengths of tape on tight curves required meticulous care. After they wiped everything with cleaning solvent, they applied the first coat of multipart polyurethane to all the surfaces outside the future nonskid. Two more topcoat applications followed within allowable, 16-hour intervals. After sanding with 220-grit paper, dusting, using the tack rag, and wiping the solvent, they rolled and brushed on the fourth and final topcoat. The solvent-resistant, ultra-smooth, high-density foam-roller covers and quality brushes delivered the best finish. Working in the hot Florida sun required frequent additions of brushing reducer.
After allowing 48 hours to fully cure, they removed the masking tape. Fresh tape was then applied along the outside margins of the nonskid areas. All was ready for applying the nonskid coats. But first Steve spent a few days experimenting. He mixed his own color tints—too dark, and you couldn’t walk barefoot on the sun-heated deck; too white, and the deck glare was intolerable.
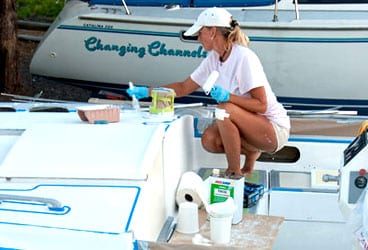
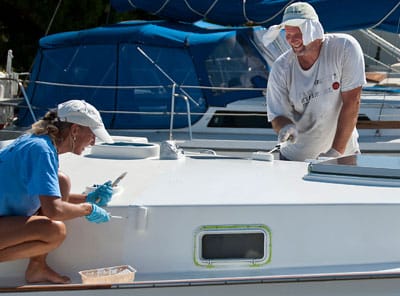
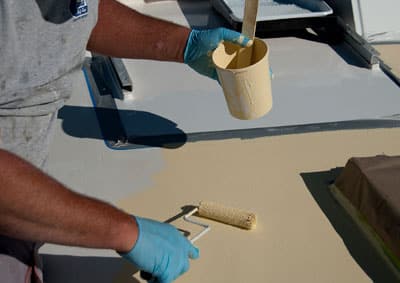
Also, he tested paint combined with various nonskid additives on scrap plywood; very coarse grit could damage human skin if a sailor knelt or fell on deck. He decided to combine equal amounts of coarse and fine grit. Significantly, this mixture prevented the coarse grit from settling down in the paint in lumps. On the big day, Steve and Janet mixed the activator with the paint base in a large container, added the correct nonskid grit, poured in the brushing reducer, and thoroughly stirred it all. After pouring small dollops within a taped area, Steve spread it out with a roller with Janet assisting, adding more paint or grit as necessary. She also wiped up Steve’s occasional paint drips with a solvent-soaked rag. The work went quickly and smoothly, though constant stirring of the paint/grit mixture was absolutely vital.
Twenty-four hours passed before heavy, late summer rain rolled in. By then, the paint had cured hard, and the coachroof was finished. They then repeated the whole operation to paint the deck. Nobody said rejuvenating a classic-plastic yacht would be quick or easy. But when the entire project was finished and Lunacy ‘s deck sparkled, the two sailors realized that all their meticulous efforts had been well worth it.
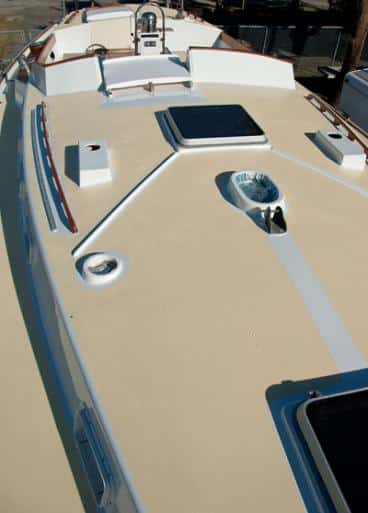
Steps:** 1. In preparation for the job, much of the deck hardware, including the stanchions, had to be removed. The remaining gear was carefully and completely covered and masked. 2. All the fastener holes were filled with silicon sealant, and the couple spent days grinding the old surfaces. Then Janet used a solvent wash to ensure a strong bond with the primer paint. 3. After dings and cracks were repaired and sanded, two coats of epoxy primer were applied. 4. Following another round of sanding, vacuuming, cleaning, and taping, the couple rolled and brushed on a fresh coat of Awlgrip topcoat. 5. After four coats of Awlgrip, it was time for the nonskid. First, Steve experimented with colors and grits. Once under way, he poured on a dollop of pre-mixed paint and spread it evenly. Note the paint stirrer, which was used to prevent the grit from settling. 6. Stirring frequently, to make sure the coverage was even in each masked area, Steve worked quickly and efficiently while Janet addressed small splashes with a solvent-soaked cloth. 7. Voilà! Once the masking tape was removed, the fresh decks fairly glistened.
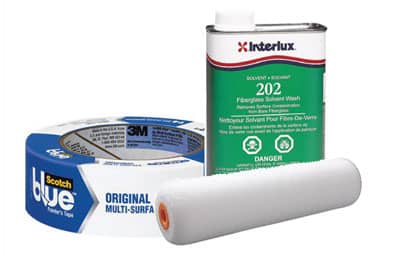
What You’ll Need: • Hook-and-loop sanding discs, sized to fit the sander pads • Sheets of sandpaper of grits 80, 100, 120, 180, 220, and 320 • 3M masking tape in widths of 1/2 inch (No. 256), 1 inch (No. 2090), and 2 inches (No. 225) • Gerson synthetic tack cloths • Roller frames and roller covers, with phenolic cores: ultra-smooth, high-density 4-inch and 6-inch roller covers (available from Home Depot; for the primers and topcoats) and Yellow stripe 3/8-inch nap (from West Marine; for the nonskid paint mixture) • Good-quality varnishing brushes • Cabisil (colloidal silica) thickening agent for making fairing putty with epoxy or polyester resin • Plastic putty knives • Interlux Fiberglass Solvent Wash 202 (for cleaning surfaces) • M.E.K. solvent (for cleaning all brushes) • Disposable paper/plastic pails of various sizes • A dozen wooden paint stirrers • Interlux Epoxy Primekote • Awlgrip topcoat (with Brushing Reducer and brushing converter) • Awlgrip Griptex nonskid additive (fine and coarse grades) • Ryobi and Makita random orbital sanders • Ryobi 6-inch palm polisher (used with a foam pad as a sander in complex spaces) • 3M breathing dust masks, ear protection, and solvent-resistant gloves
Longtime CW contributor Tom Zydler and his wife, Nancy, plan on spending this summer exploring the coast of Labrador aboard their Mason 44, Frances B .
- More: boat maintenance , How To , maintenance
- More How To

Rigging Redo: A Switch to Synthetic

Top Tools for Sailboat Cruising: Must-Have Gear for 2024

Made for Shade: Cockpit Cover Options

Blackwater Wisdom for Holding Tanks

North Sails Parent Company Buys Doyle, Quantum

For Sale: 1984 Camper & Nicholsons 58

Sailing Avocet : A New Adventure Begins
- Digital Edition
- Customer Service
- Privacy Policy
- Terms of Use
- Email Newsletters
- Cruising World
- Sailing World
- Salt Water Sportsman
- Sport Fishing
- Wakeboarding
Princeton Blog
Blog categories.
- All categories
- Mixed Media
- Oil Painting
- Artist Spotlight
- Fashionable Fridays: Art in Fashion
- Featured Brush
- Artist Tips
- Free Projects
- Painting Techniques
- What's New at Princeton Brush
- Where's Howard?

November 7, 2017
Watercolor Sailboat Painting Tutorial

Los Angeles-based watercolor artist Maria Raczynska demonstrates how to paint a beautiful birds-eye ocean scene with a sailboat in this video tutorial!
Filter Blog Categories
Filter gallery categories, gallery categories.
- Kurt Weismair
- Terry Moeller
- Gentian Osman
- Kickstradomis
- Holly Hanley
- Michael Fitts
- Josh Tiessen
- Imperial Gallery
- Heritage Gallery
- Summit Gallery
- Neptune Gallery
- Umbria Gallery
- Select Artiste Gallery
- Expressionism
Join Our Mailing List
Sign up now to receive monthly newsletters featuring talented artists, tutorials, news and more!
We do not sell your information. All emails include an unsubscribe link. You may opt-out at any time. See our privacy policy .
How to Paint a Boat: A Step-by-Step Guide for a Fresh Finish
There’s something special about a well-maintained boat gliding through the water, its sleek and vibrant appearance turning heads along the shore. Boat maintenance plays a vital role in preserving both the aesthetic appeal and the structural integrity of the vessel. Among the many aspects of boat care, painting is a key element that can truly transform its appearance and provide long-lasting protection.
Painting a boat is not just about maintaining its beauty; it’s a process that instills a sense of pride and accomplishment. The sight of a freshly painted boat, glistening under the sun, evokes a feeling of satisfaction and signals to others your commitment to preserving your vessel.
In this comprehensive guide, we will take you through the necessary steps and provide valuable tips to help you effectively paint your boat. Whether you are restoring an old boat or looking to give a new life to your current one, this article will equip you with the knowledge and techniques needed for a successful paint job. Get ready to embark on a journey that will not only enhance the appearance of your boat but also protect it for years to come.
Assessing the Boat’s Condition

Before embarking on the painting process, it is crucial to assess the condition of your boat. Here’s why it’s important:
- Identifying Damage and Corrosion: Assessing the boat’s condition allows you to identify any damage or corrosion that needs to be addressed before painting. Look for areas where the fiberglass, wood, or metal may be compromised, such as cracks, blisters, or rust. Repairing these issues ensures a solid foundation for the paint and prevents further damage.
- Surface Imperfections: Surface imperfections like dents, scratches, or peeling paint can affect the overall finish. Identifying these imperfections allows you to address them through proper surface preparation techniques such as sanding, filling, or fairing. Achieving a smooth surface is crucial for a professional-looking and long-lasting paint job.
- Proper Preparation: Adequate preparation is key to achieving a durable and flawless paint finish. This includes cleaning the boat’s surface to remove dirt, grease, or contaminants, as well as removing any loose or flaking paint. Properly preparing the surface ensures good adhesion of the paint and improves its longevity.
By assessing the boat’s condition, you can address any existing damage or imperfections and ensure proper preparation for the painting process. This sets the foundation for a smooth and durable finish that not only enhances the appearance of your boat but also protects it against the elements for years to come.
Gathering the Necessary Supplies
To paint a boat effectively, it is important to gather the necessary supplies. Here’s a list of essential items you will need:
- Marine-Grade Paint: Choose a high-quality marine-grade paint specifically designed for boats. Consider the type of material your boat is made of (fiberglass, wood, aluminum, etc.) and select a paint suitable for that material. Marine-grade paints are formulated to withstand the harsh marine environment, providing durability, UV protection, and resistance to water, salt, and weathering.
- Primer: Use a primer designed for marine applications to ensure proper adhesion and longevity of the paint. The primer creates a stable base for the paint to adhere to, enhances its durability, and improves the overall finish.
- Paint Brushes or Rollers: Select high-quality paint brushes or rollers suitable for the type of paint you are using. Brushes with synthetic bristles are often recommended for applying marine paints. Rollers are ideal for larger areas and can provide a smoother finish.
- Masking Tape: Masking tape is essential for creating clean and precise lines between different painted areas. It helps protect areas that you don’t want to paint, such as windows, hardware, or trim.
- Sandpaper and Sanding Tools: Various grits of sandpaper, ranging from coarse to fine, are needed for surface preparation. Sandpaper helps smooth out imperfections, remove old paint or varnish, and create a suitable surface for the new paint to adhere to. Sanding tools like sanding blocks or orbital sanders can aid in achieving an even and consistent surface.
- Protective Equipment: Wear appropriate protective equipment, including safety goggles, a respirator mask, gloves, and protective clothing. These items help protect you from paint fumes, dust, and chemical exposure, ensuring your safety during the painting process.
It is crucial to select high-quality marine-grade paint that is specifically designed for the material of your boat. Using the right paint ensures optimal adhesion, durability, and resistance to the marine environment. It also provides a long-lasting finish that protects your boat and maintains its appearance over time.
By gathering the necessary supplies and choosing the right marine-grade paint, you set yourself up for a successful boat painting project, achieving a beautiful and durable finish that enhances the overall aesthetics and protection of your vessel.
Preparing the Boat for Painting
Preparing the boat’s surface is a crucial step in achieving a smooth and professional paint finish.
Here’s a guide to preparing your boat for painting:
- Cleaning the Boat’s Surface: Start by thoroughly cleaning the boat’s surface to remove dirt, grime, and any contaminants. Use a mild detergent or boat-specific cleaner and scrub the surface with a soft brush or sponge. Rinse thoroughly with clean water to ensure no residue remains. Cleaning the surface allows the paint to adhere properly and ensures a clean base for the new coat.
- Removing Loose or Flaking Paint: Inspect the boat’s surface for any loose or flaking paint. Use a scraper or putty knife to gently remove the loose paint. Be careful not to damage the boat’s underlying material. Removing loose paint helps create a smooth and even surface for the new paint to adhere to.
- Sanding the Surface: Sanding is essential to create a suitable base for the new paint. Start by using coarse-grit sandpaper (around 80-120 grit) to remove any remaining old paint, smooth out imperfections, and promote adhesion. Use a sanding block or orbital sander to ensure an even and consistent sanding pattern. Gradually progress to finer-grit sandpaper (around 220-320 grit) for a smoother finish. After sanding, clean the surface again to remove any sanding dust.
- Filling and Fairing: If there are any dents, scratches, or imperfections on the boat’s surface, use a suitable filler or fairing compound to repair them. Follow the manufacturer’s instructions for the specific product you are using. Apply the filler or fairing compound with a putty knife, smoothing it out to create a level surface. Once the filler has cured, sand it lightly to ensure it blends seamlessly with the rest of the surface.
By cleaning the boat’s surface and removing loose or flaking paint, you create a clean canvas for the new paint. Sanding helps create a smooth and suitable base, promoting proper paint adhesion and ensuring a professional-looking finish. Filling and fairing any imperfections further enhance the overall appearance of the painted surface.
Remember to wear appropriate protective equipment, such as gloves and a respirator mask, during the preparation process to protect yourself from dust, chemicals, and fumes. Proper preparation sets the stage for a successful paint job, ensuring a beautiful and long-lasting finish for your boat.
Applying Primer and Paint

Applying primer and paint is a critical step in the boat painting process. Here’s a guide to help you achieve a professional finish:
The Role of Primer:
Primer plays a vital role in the painting process. It enhances paint adhesion, improves durability, and helps create a uniform surface. It also seals the underlying material, preventing moisture penetration and protecting it from potential damage. Applying primer ensures that the paint adheres properly and provides a long-lasting and high-quality finish.
Applying Primer:
- Preparation: Ensure the surface is clean, dry, and properly sanded. Follow any specific instructions provided by the primer manufacturer.
- Mixing: Thoroughly mix the primer according to the manufacturer’s instructions. Use a stir stick or paint mixer to ensure proper blending of the components.
- Application: Apply the primer using a high-quality brush or roller suitable for the type of primer you are using. Start from one end and work your way across the surface in smooth, even strokes. Ensure even coverage and avoid leaving thick or thin spots. Follow the manufacturer’s recommended coverage and application thickness.
- Drying Time: Allow the primer to dry according to the manufacturer’s instructions. This usually ranges from a few hours to overnight. Avoid touching or disturbing the surface during the drying process.
Applying Paint:
- Preparation: Ensure the primer is dry and properly cured before applying paint. Stir the paint thoroughly to achieve a consistent color and texture.
- Application: Apply the paint using the same techniques as the primer, starting from one end and working your way across the surface. Use smooth, even strokes to achieve consistent coverage. Avoid applying the paint too thickly, as it can lead to drips or runs. Allow each coat to dry before applying subsequent coats, following the manufacturer’s recommended drying times.
- Multiple Coats: Apply multiple coats of paint as necessary to achieve the desired color and finish. Allow each coat to dry and lightly sand between coats to promote adhesion and ensure a smooth surface.
Maintain good ventilation during the painting process, and follow all safety precautions recommended by the primer and paint manufacturers.
Properly applying primer and paint ensures a durable and visually appealing finish. Adhere to the manufacturer’s instructions for mixing, application, and drying times to achieve the best results. Take your time, be patient, and aim for even coverage to create a beautiful and long-lasting paint job for your boat.
Painting Different Boat Surfaces
Painting different boat surfaces requires specific considerations and techniques. Here’s a guide to help you achieve optimal results on various surface types:
Fiberglass:
- Clean the fiberglass surface thoroughly to remove any dirt or contaminants.
- Use a marine-grade fiberglass primer designed specifically for fiberglass boats. Follow the manufacturer’s instructions for proper mixing and application.
- Apply multiple thin coats of marine-grade paint, allowing sufficient drying time between each coat.
- For optimal results, sand lightly between coats to promote adhesion and achieve a smooth finish.
- Follow the manufacturer’s recommended number of coats and drying times for the specific paint you are using.
- Ensure the wood surface is clean, dry, and properly prepared.
- Apply a suitable wood primer to seal the surface and promote proper paint adhesion. Follow the manufacturer’s instructions for application and drying time.
- Use marine-grade paint suitable for wood surfaces. Apply multiple thin coats, allowing each coat to dry fully before applying the next.
- Sand lightly between coats to achieve a smooth finish and promote adhesion.
- Consider using a varnish or clear coat as a final protective layer over the paint, especially for areas exposed to direct sunlight and water.
- Clean the metal surface thoroughly to remove any rust, grease, or contaminants. Use a suitable metal cleaner or solvent.
- Apply a metal primer designed to inhibit corrosion and promote adhesion. Follow the manufacturer’s instructions for proper mixing and application.
- Use marine-grade paint suitable for metal surfaces. Apply multiple thin coats, ensuring even coverage and avoiding drips or runs.
- Consider using a rust-inhibiting paint or a paint specifically designed for metal surfaces exposed to saltwater.
- Sand lightly between coats to promote adhesion and achieve a smooth finish.
Each surface type presents unique challenges and requirements. Following the manufacturer’s instructions for the specific primers and paints you choose is essential. Pay attention to the recommended number of coats, drying times between coats, and any specific instructions regarding surface preparation or sanding.
Remember, proper surface preparation, the use of high-quality primers and paints, and allowing sufficient drying time between coats are key to achieving optimal results. Take your time, follow the instructions, and enjoy the process of transforming your boat into a stunning work of art.
Finishing Touches and Cleanup

The finishing touches and cleanup are essential steps to complete your boat painting project. Here’s a guide to help you with these final tasks:
Finishing Touches:
- Remove Masking Tape: Once the paint has dried sufficiently, carefully remove the masking tape to reveal clean and crisp lines. Pull the tape at a 45-degree angle to avoid peeling off any fresh paint. Inspect the edges and make any necessary touch-ups with a small brush.
Cleaning Paint Brushes or Rollers:
- Clean Immediately: It’s important to clean your paint brushes or rollers immediately after use to prevent the paint from drying and hardening on the bristles.
- Use the Proper Solvent: Refer to the paint manufacturer’s instructions for the recommended solvent or cleaning agent to use for the specific type of paint you used. Some paints may require water-based cleaners, while others may need mineral spirits or other solvents.
- Thoroughly Clean: Rinse the brushes or rollers with the appropriate solvent, working the bristles or nap to remove all traces of paint. Repeat the process as needed until the brushes or rollers are clean. For stubborn paint, you may need to use a brush comb or wire brush to remove it.
- Dry and Store: After cleaning, allow the brushes or rollers to dry completely before storing them. Hang brushes upside down or store them flat to maintain their shape.
Proper Disposal and Cleanup:
- Disposing of Paint Cans: Dispose of empty or partially empty paint cans according to local regulations . Many areas have specific guidelines for proper disposal of paint cans, which may include recycling or hazardous waste centers. Check with your local authorities for the appropriate disposal methods to protect the environment.
- Cleanup: Clean up the work area, ensuring all paint cans, brushes, and other materials are properly stored or disposed of. Dispose of any used masking tape, drop cloths, or other debris responsibly.
Paying attention to the finishing touches, such as removing masking tape for clean lines, enhances the overall appearance of your paint job. Cleaning paint brushes or rollers promptly after use helps maintain their quality and extends their lifespan.
Proper disposal of paint cans and responsible cleanup is crucial for protecting the environment. Follow local regulations and guidelines to ensure you dispose of any materials in an environmentally friendly manner.
By giving attention to these final steps, you can proudly admire your beautifully painted boat and enjoy the satisfaction of a job well done.
Watch Fiberglass boat painting made easy: prep, paint and top coat with a roller | Video
Top 5 FAQs and answers related to How to paint a boat
How long does it take to paint a boat.
The time it takes to paint a boat can vary depending on factors such as the size of the boat, the number of coats desired, the surface condition, and weather conditions. It is recommended to allocate several days or even weeks for the entire process, including surface preparation, priming, and painting, allowing for proper drying times between coats.
Can I paint my boat myself, or should I hire a professional?
Painting a boat can be a DIY project, but it requires careful planning, proper preparation, and attention to detail. If you have experience with painting or feel confident in your abilities, you can certainly tackle it yourself. However, if you’re uncertain or have a large boat with complex surfaces, hiring a professional painter with expertise in marine applications may be a wise choice to ensure a high-quality finish.
Do I need to remove the old paint before applying a new coat?
In most cases, it is recommended to remove loose or flaking old paint before applying a new coat. However, if the existing paint is in good condition, you can sand it lightly to create a suitable surface for the new paint to adhere to. It is important to ensure a clean and smooth base for optimal results.
How many coats of paint should I apply to my boat?
The number of coats depends on several factors, including the type of paint, desired color intensity, and personal preference. In general, it is recommended to apply at least two or three coats of paint to achieve good coverage and durability. Follow the paint manufacturer’s instructions for the specific product you are using, as they will provide guidance on the recommended number of coats.
How do I maintain and protect the newly painted boat?
To maintain and protect your newly painted boat, it’s important to follow proper care and maintenance practices. Regularly clean the boat’s surface using mild cleaners and avoid abrasive materials or harsh chemicals that could damage the paint. Apply a protective wax or polymer coating to enhance the paint’s durability and UV resistance. Additionally, inspect the painted surface periodically for any signs of damage or wear and address them promptly to prevent further issues.

Painting a boat is a rewarding and satisfying part of boat maintenance, and with the knowledge gained from this comprehensive guide, you can achieve a fresh and impressive paint finish. Let’s recap the key steps and considerations discussed:
- Assess the boat’s condition, identifying any damage, corrosion, or surface imperfections that require repair before painting.
- Gather the necessary supplies, including marine-grade paint, primer, brushes or rollers, masking tape, sandpaper, and protective equipment.
- Prepare the boat’s surface by cleaning it thoroughly, removing loose or flaking paint, and sanding to create a smooth base.
- Apply primer to ensure proper adhesion and durability, following the manufacturer’s instructions for mixing, application, and drying times.
- Apply paint using even strokes, ensuring proper coverage, avoiding drips or runs, and allowing each coat to dry before applying the next.
- Pay attention to specific considerations for different boat surfaces, such as fiberglass, wood, or metal.
- Attend to finishing touches, such as removing masking tape and ensuring clean lines.
- Clean paint brushes or rollers immediately after use, following the manufacturer’s instructions for the specific type of paint used.
- Dispose of paint cans and cleanup materials responsibly, following local regulations to protect the environment.
Thorough preparation, selecting high-quality materials, and following proper application techniques are essential for achieving a professional and long-lasting paint finish on your boat. Take pride in your boat’s appearance and enjoy the process of transforming it into a stunning vessel on the water.
With the knowledge and guidance provided in this guide, you have the tools to embark on your boat painting project with confidence. So, get ready to give your boat a fresh new look and take pride in the impressive results you’ll achieve. Happy painting!
Share How to Paint a Boat: A Step-by-Step Guide for a Fresh Finish with your friends and Leave a comment below with your thoughts.
Read How to Remove Water Stains from a Fiberglass Boat? Guide until we meet in the next article.
Similar Posts

Boats on the Braies Lake Pragser Wildsee in Dolomites Mountains Sudtirol Italy
Nestled amidst the breathtaking Dolomites of South Tyrol, Italy, lies a jewel-toned gem called Braies Lake (Pragser Wildsee). Its emerald waters, framed by towering peaks and verdant forests, create a scene straight out of a fairytale. And what better way to experience this magical landscape than by gliding across its glassy surface in a picturesque…
")
Pontoon Boat for Sale in Pennsylvania (PA)
Pennsylvania boasts beautiful lakes, rivers, and reservoirs, making it a prime spot for pontoon boating enthusiasts. These versatile vessels offer a stable and comfortable platform for cruising, fishing, swimming, or simply soaking up the sun with family and friends. If you’re in the market for a pontoon boat in the Keystone State, this comprehensive guide…

3 Most Common Problems with Yamaha VMAX SHO
The Yamaha VMAX SHO, with its potent blend of power, performance, and sleek design, has captivated boaters seeking exhilaration on the water. However, even the most formidable engines encounter glitches. So, before throwing caution to the wind and unleashing the beast, let’s dive deep into the most common problems VMAX SHO owners face, exploring potential…

Larson Boats Models: Quality and Performance on the Water
Larson Boats has been a mainstay in the American boating industry for over a century. Founded in 1912 by brothers Carl and Adolph Larson, the company has built a reputation for crafting high-quality, innovative boats that cater to a wide range of boating enthusiasts. Throughout their history, Larson has produced a diverse range of models,…

How Long Do Boat Batteries Last? Facts and Maintenance Tips
Boat batteries play a vital role in powering essential systems and equipment on board, making them a crucial component for any boat owner. From starting the engine to running navigational electronics and powering various amenities, a reliable and well-maintained boat battery is key to a successful and enjoyable boating experience. Understanding the lifespan of boat…

Pontoon Boat for Sale Tennessee: Buying Guide
Tennessee’s pristine lakes, sprawling reservoirs, and majestic rivers make it a boater’s paradise. Pontoon boats, with their spacious decks, comfortable seating, and ease of operation, are a popular choice for families and friends seeking fun and relaxation on the water. If you’re looking to join the ranks of Tennessee’s pontoon boat captains, this guide will…
- New Sailboats
- Sailboats 21-30ft
- Sailboats 31-35ft
- Sailboats 36-40ft
- Sailboats Over 40ft
- Sailboats Under 21feet
- used_sailboats
- Apps and Computer Programs
- Communications
- Fishfinders
- Handheld Electronics
- Plotters MFDS Rradar
- Wind, Speed & Depth Instruments
- Anchoring Mooring
- Running Rigging
- Sails Canvas
- Standing Rigging
- Diesel Engines
- Off Grid Energy
- Cleaning Waxing
- DIY Projects
- Repair, Tools & Materials
- Spare Parts
- Tools & Gadgets
- Cabin Comfort
- Ventilation
- Footwear Apparel
- Foul Weather Gear
- Mailport & PS Advisor
- Inside Practical Sailor Blog
- Activate My Web Access
- Reset Password
- Customer Service

- Free Newsletter
Mason 33 Used Boat Review

Beneteau 311, Catalina 310 and Hunter 326 Used Boat Comparison

Maine Cat 41 Used Boat Review

Cheoy Lee Clipper 36 & 42 Used Boat Review

Tips From A First “Sail” on the ICW

Tillerpilot Tips and Safety Cautions

Best Crimpers and Strippers for Fixing Marine Electrical Connectors

Thinking Through a Solar Power Installation

Stopping Mainsheet Twist

Working with High-Tech Ropes

Getting a Clue for the Blown-Out Clew

Monel Seizing Wire is Worth the Extra Cost
Fuel Lift Pump: Easy DIY Diesel Fuel System Diagnostic and Repair

Ensuring Safe Shorepower

Sinking? Check Your Stuffing Box

The Rain Catcher’s Guide

Boat Maintenance for the Technically Illiterate: Part 1

Whats the Best Way to Restore Clear Plastic Windows?

Mastering Precision Drilling: How to Use Drill Guides

Giving Bugs the Big Goodbye

Galley Gadgets for the Cruising Sailor

Those Extras you Don’t Need But Love to Have

UV Clothing: Is It Worth the Hype?

Preparing Yourself for Solo Sailing

How to Select Crew for a Passage or Delivery

Preparing A Boat to Sail Solo

On Watch: This 60-Year-Old Hinckley Pilot 35 is Also a Working…

On Watch: America’s Cup

On Watch: All Eyes on Europe Sail Racing

Dear Readers

Chafe Protection for Dock Lines
- Boat Maintenance
Topside Paint Test Kicks Off with a Look at Application and Gloss, Tips and Techniques
Practical sailor rates dozens of enamel, one-part urethane, and two-part urethane paints..

All that glitters isn’t gold, and as the price of professional topside makeovers continues to climb, many do-it-yourselfers are looking to other alternatives.
A gleaming paint job remains an icon of yacht-quality maintenance, and paint makers spin the transformative ability of what comes in their cans. The good news is that there’s still some truth in advertising. After a close look at the latest paint systems, Practical Sailor testers offer a report on just how user-friendly topside paints have become.
A few decades ago, an aircraft paint company executive decided to paint his boat with the same stuff used to coat aircraft that flew at 450 knots—the stuff that seemed immune to UV degradation and shed hydraulic fluid like water off a duck’s back. The results were more than impressive, and his experiment with a paint called Alumagrip led to a marine-coatings revolution and the birth of Awlgrip.
With the new brand came a new coating process that featured an epoxy primer and a sprayed linear-polyurethane topcoat. Today, Awlgrip has expanded its line to both polyester and acrylic-modified polyurethane top coats. The paint has become the gold standard among pros, but it’s occasionally used by amateurs.
Paint companies have responded to the demand for do-it-yourself (DIY) glossy finishes, and a plethora of single-part modified alkyd enamels, mono-urethanes, and two-part products line chandlery shelves.
In the same vein as our bottom paint and wood coatings tests, this topside paint evaluation begins with a report on application, handling, coverage, and initial gloss. After some field testing, we’ll rate each paint’s hardness, gloss retention, and long-term durability. Our last long-term look at these products was launched in the Feb. 15, 2002 issue and closed with a final report in the May 2006 issue.
What We Tested

We applied 29 topside paints from nine manufacturers to fiberglass panels. With such a large test field, we opted to divide the products by paint type. Of the test paints, seven are alkyd enamels; 12 are one-part urethanes; and eight are two-part linear polyurethane. We’ve classified two as “other” as they fit into none of the categories.
• Enamels: We found that choosing the right topside paint for the job at hand is based both on paint characteristics and applicator skill. At the easiest-to-apply end of the spectrum are traditional alkyd enamels, paints that are relatively soft, easy to sand, and almost creamy in brushability.
In the days of carvel-planked and clinker-built wooden boats, an annual coat of topside paint was part of the spring commissioning routine. The softer enamels delivered a season of shine, oxidizing a little over winter, and by spring, they were ready for a light-scuff sanding and a rejuvenating coat of alkyd enamel. Products like Pettit’s Z-Spar 100 and semi-gloss 101 and Interlux Premium Yacht Enamel were hard to keep on the shelf.
Today, there’s still an “enamel” demand, and products like Sherwin-Williams 1000, Kirby’s Hull and Deck enamel, and Z-Spar 1195 have been added to the fray. These paints excel in their ability to be easily applied. They are reduced with mineral spirit-based solvents and are soft enough for easy sanding between coats. However, the long-term gloss retention and adhesion of enamel is not as good as that of the higher-tech paints that have cornered the market.
• One-parts: In the middle range of topside paint technology are one-part urethane modified enamels. These are harder, glossier, and tougher coatings than alkyd enamels. They exhibit traits more akin to two-part systems, yet handle with almost as much ease as a traditional enamel. They are faster-drying, quicker-to-skin paints, and must be carefully thinned with specific reducers to retain good flow characteristics. A major benefit of these paints is their forgiveness on vertical surfaces where “hangs and sags” are just waiting to happen. Single-part urethane enamels offer multi-year shine, and on a couple of applications we have been field testing, the paint has weathered four years as a nonskid surface in a cockpit sole (Interlux Brightside).

• Two-parts: At the high end of the topside paint spectrum—in cost, durability, and gloss—are the two-part linear polyurethane (LPU) products that use an isocyanate catalyst to cure the paint. More a plastic resin than an old-fashion enamel, these “wonder coatings” typically afford a wet look that packs automotive showroom brilliance. The downside of this reflective quality is the need for smooth, even, dust-free application, and the extra effort associated with surface preparation.
All of the two-part products we tested produced superior results but also proved to be more difficult to handle than one-part products. One factor common to all of the two-part paints is the detailed prep work required, but testers found that it does pay off in the long run.
What We Found
• Enamels: Don’t sideline traditional alkyd enamels. They are easy to handle, require less exacting preparation, and are a pure pleasure to brush on. When used in low-abrasion situations where modest gloss is an asset, they can prove to be just the right paint.

Pettit’s Z-Spar No. 1195 Grand Banks Beige stole the show with its smooth, even flow and Excellent coverage. Other oil-based alkyds in the Z-Spar line (Nos. 99 and 100) featured the same remarkable handling quality that makes it a favorite among carvel and clinker-built wooden boat owners.
Both Kirby’s Hull and Deck Enamel gloss white and semi-gloss proved easy to handle and developed a smooth, even skin. The only disappointment was the streaky nature of its medium-gray enamel. Even after re-stirring, it required three coats to develop a smooth hue. The difference highlights the fact that even though one manufacturer makes multiple colors of paint, one color may not have the same gloss or application qualities as another color.
Sherwin-Williams’ Seaguard 1000 was another smooth-flowing, user-friendly, oil-based alkyd enamel. It spread evenly on vertical surfaces and was reluctant to hang or sag.
Bottom Line: Most of the enamels we tested performed well, comparatively. Our top picks so far for application and initial gloss are the Z-Spar Solid Coat No. 99 and Marine Enamel No. 1195.
• Single-part urethane enamels: By far, DIY topside paint technology has grown the most in the one-part urethane modified enamels sector, a best-of-both-worlds formulation that boasts of shine and longevity. Almost as user-friendly as an alkyd enamel and with almost as much gloss as the two-part paints, these hybrids certainly live up to expectations.

In a near photo finish in our application testing, Interlux’s Toplac and Epifanes’ Mono-urethane crossed the line in a dead heat with Insignia’s Resilience rounding out the winners’ circle. (Resilience is branded as a “for pro application-only paint.”) Snapping at their heels were Interlux Brightside, Pettit Easypoxy, and West Marine’s SeaGloss Pro. Two of the most popular colors on the nautical pallet have been Interlux’s Kingston Gray and Hatteras Off White.
Bottom Line: This was a close race, but the very slight edge for application goes to Interlux’s Toplac.
• Two-part paints: When it comes to surface toughness, bright gloss, and maximum longevity, two-part paints stand alone. Paint in name only, these acrylic and polyester modified-urethane resins have the ability to suspend pigment in a flat, highly reflective skin. The trick lies in applying the coating evenly and just thick enough for it to flow, making brush strokes or orange peel disappear.
As with all forms of juggling, a minor slip can spell major problems. Consequently for DIY interest, we looked carefully for paints that behaved well when rolled and brushed. Once again, Interlux and Epifanes crossed the line in a dead heat: Interlux’s Perfection and Epifanes’ Polyurethane products flowed smoothly over horizontal and vertical surfaces and resisted the tendency to hang or sag.
Fabula Inc.’s Signature Finish, which comes with brushes, rollers, tape, mixing graduates, stirrers, and detailed instructions also hit the mark. Sherwin-Williams’s vivid red two-part was the smoothest flowing red of the three we tested. Insignia’s Brilliance, like Awlgrip is a “pro only” recommended product, and once the right amount of brushing reducer was added to cope with the warm weather, these products also ranked as standouts.

The volatility of the solvents in all these two-part system leaves the user with less time to muck around, and maintaining a wet edge is essential to the “cutting in” process. Each manufacturer provides a “slow” brushing reducer that has to be carefully used. Too much causes excess flow—and the drama mentioned earlier of hangs and sags. In short, two-part paints typically provide the best gloss and toughest, longest-lasting finish, but they are the hardest to handle.
Bottom Line: The Awlgrip, Epifanes, and Interlux two-parts were the only products to earn across-the-board Excellent ratings.
• Other: As soon as we popped the lid on the first can of CrystaLac Crab Coat, we noticed change in the air. Absent was the aroma of oil or the volatile solvent jolt of urethane-based chemistry. In fact, the smell was imperceptible, and that made this paint especially appealing for those working inside a shop or below deck.

Crab Coat is not a water-based paint, but it is hydrophilic enough to allow water-only cleanup. It handles more like a blend between thick, creamy enamel and a water-based Latex. However, this paint is meant for exterior marine use. Time and our test panels will spell out how it weathers the environmental onslaught. It brushed on smoothly, but its Mystic Green color presented a somewhat streaky appearance.
Bottom Line: Though not as glossy as the current crop of urethanes, the Crab Coat produces a very appealing semi-gloss finish.
Topside and deck painting are labor-intensive undertakings that can rejuvenate an aging vessel as well as protect the substrate that lies beneath. Those enamored by the finish of the dark-blue Hinckley and Morris fleets have a tall order to meet.
Those willing to stay with white or a light color who are ready to invest equal amounts of time, patience, and skill, can parlay the cost of materials into a durable and attractive finish.
To say that the average roll-and-tip finish is just as good as a pro-sprayed finish would evoke too much of the Pinocchio factor. The results attainable by the average applicator can be quite good, but to hit the bull’s eye takes a steady hand, or the willingness to follow an autobody shop approach one of the paint manufacturers recommends.
One paint maker, Signature Finish, offers three sets of instructions, allowing DIYers to choose the level that suits them. Level 1 is straightforward: Apply three coats of their two-part paint (no primer), scuff sand between coats, and accept the last coat as the done deal. A Level 2 finish involves buffing with 3M Super Duty rubbing compound, and for those with more vigor and higher standards, there’s an exacting Level 3: Apply three or more coats, and once it’s dry (three to five days), wetsand it down to 1,200 or 2,000 grit followed up with the machine-buffing process. The workable acrylic LPU paint is highly buffable, and the result is a smooth, glossy surface, but care must be taken not to remove too much material.
Before committing to a big project, do a bit of testing of your own. A good test is to paint a pair of dinghy oars with good-quality enamel, then paint the inside of the dinghy with a one-part urethane, and finally flip it over, and go through a full prep-and-prime process that leads up to a roll-and-tip application of a two-part LPU paint. From this experience, you’ll have developed important painting skills and better understand the task that lays ahead.
All of the products we tested ranked at least acceptable in handlability, and many excelled. Only time will answer questions about durability and gloss retention.
Regardless of the paint you choose, be sure to review all of the manufacturer’s printed and online technical information, follow all safety procedures, and keep in mind that when it comes to painting, success is in the eye of the paint-brush holder.
- How We Tested
- Practical Sailor Value Guide: Topside Paints Application
- DIY Notebook
RELATED ARTICLES MORE FROM AUTHOR
Leave a reply cancel reply.
Log in to leave a comment
Latest Videos

The Perfect Family Sailboat! Hunter 27-2 – Boat Review

Pettit EZ-Poxy – How to Paint a Boat

The Boat From True Spirit – Sparkman & Stephens

Top 5 Boat Hacks – Boat Maintenance Tips and Tricks
Latest sailboat review.

- Privacy Policy
- Do Not Sell My Personal Information
- Online Account Activation
- Privacy Manager

How to Paint a Tall Ship Sailboat in Watercolour

Skill Level : 2 Intermediate
Medium : Watercolour Painting
Subject : Seascapes
Tutor : Dennis Clark
Class Length : 2 hours 20 minutes
Avg Rating : No Ratings Yet
Silver Level or Higher Class
Class Description
- Read Class Reviews
Gone are the days when the ocean was filled with all types of sailing ships. Fortunately there are still some sailboats sailing the high seas. It is certainly a grand sight when a tall ship sails into a modern harbour. The sight conjours up the imagination of pirates and gun ships in battle.
In this lesson you will learn:
1. How to paint a stormy sky to offset the light coloured sails 2. How to paint the seas to give the impression of waves in motion 3. How to add colour to the sails 4. How to simplify the deck detail and shrouding and more ...
Latest Reviews
Dennis: I really enjoyed this class. Thank you for an informative lesson. Kathy KathyKuz
Unlock the Follow Along Class HERE
Short class video.
Class Tutorial
Tall sailing ships have always captured the imagination of the adventurous. Pirates with eye patches and a hook hand and all that. What we are going to do is paint one in watercolour.
This is the photo we will be working from:

We will unfurl the last sail so that we have a better looking ship.
Masking the Sails

There is a lot of white areas to be protected so use masking fluid to do this. About ½ inch or 15mm around the edge of the sails should be enough protection.
When you have protected all areas that need to be, gently blow dry before proceeding.
Painting the Sky

With a large flat brush wet all the sky area and then float in some Cobalt Blue.
Be careful to keep the horizon straight.

Add more blue pigment to the sky mix and bring a touch of Burnt Sienna to warm it up a bit. Drop this colour into the wet sky and move it around to suit. We are looking for a darkish sky in order to contrast with the light sails. This will ensure a lovely dramatic painting.

With a bundled up tissue dab some areas to give the impression of cloud billows.
Painting the Sea

Make up a light mix of Blue and Viridian and paint the sea with horizontal strokes. Don't paint it too evenly. To be able to indicate some nice windswept waves use the two colours in horizontal lines and intermingled.
Keep the foreground darker at the lower end of the painting and lighter towards the horizon.

Now we can begin to add in the curved lines for the swells and waves. Don't overdo it and make the waves too wild. The waves will get smaller into the distance.

Because clouds show reflections from the sea surface, very carefully glaze in a few light sea colour on sections of the clouds. This creates a colour harmony between sea and sky.

Use a small round brush to paint in the shadow areas of the waves. Note that each swell will have a light refection on the top edge.
A word of warning: Don't make the swells too large in relation to the size of the ship.

Paint the dark reflection of the ship.
Dry the sea area before continuing.
Enjoying This Tutorial?
Painting the sails.

Remove the masking fluid off the ship.
With an Orange/Brown colour begin painting in all the spars and the masts. To keep them straight and even it is best to do so with a series of short strokes.

The sails are made out of a very strong cotton cloth or canvas and unless they are new sails, they will be slightly discoloured and yellow from being exposed to the harsh elements.
To achieve the aged look, start painting, or rather glazing, some Yellow Ochre over the sails.

When that has been completed, mix up a light Blue/Gray for adding the shadows on the sails. Remember to show any folds in the sails themselves.

Continue working on the shadows and eventually adding the darkest shadows under the spars. Touch up, with a light Gray for the seams at the edge of the sails.
Carefully add the other details in the sails and the shadows on the masts.
Touch up all the other smaller details in the sail areas, including the flag.
Painting the Ship

With a very dark mix of Brown made up from Ultramarine Blue and Burnt Sienna, paint the hull of the sailing ship and the lighter strip on the side.

Now comes the interesting part of this painting, and it is all the small details on the deck. In the reference photograph there is a ton of detail. Now, we are NOT going to paint all the detail as shown in the photograph.
We are going to simplify the lot by blocking in the main shapes only. Slowly build up the various tones and colours. Be careful to keep the general shapes of the sailors.

As you can see there is simply a suggestion of all the items on the deck and no details whatsoever.

Once the shapes have been painted we can now, with a small round brush add the railings.
Add Finishing Details

Paint in a gull or two for some extra movement and interest. This close-up shows just how simplified all the details are.

With some Chinese White, straight out the tube, touch up all the small areas that need White, such as the tips of the spars.

For this size of sailing ship we would not be able to paint in the thin ropes with a small brush. They would just be too thick. We will add them in with a very sharp-pointed pencil. A 0.5mm Mechanical pencil works very well here.
Notice that I am only adding in the main rigging and leaving out all the lesser ropes. It is not necessary to add them all in. The brain is well able to add them in for you.

Again, with Chinese White, add the bow wave of the ship as well as the highlights in the deck area and some of the wave tops.
To finish off I want you to notice that each sail has a slightly different brightness than the others. Don't try to keep them all the same colour.
This is what the final painting looks like:

About Dennis Clark
Read more about Dennis Clark

Follow Us on :
Copyright © · Paint Basket TV · All Rights Reserved
As an Amazon Associate, I earn from qualifying purchases.
Pin It on Pinterest
- Sunfish Talk
- Sunfish For Sale
- Sunfish Wanted Ads
Follow along with the video below to see how to install our site as a web app on your home screen.
Note: This feature currently requires accessing the site using the built-in Safari browser.
Sunfish Hull Original Color Paint
- Thread starter BillMc
- Start date Apr 7, 2020
- Apr 7, 2020
Im new to the forum. haven't seen this question yet, is there an after market paint that matches up exactly to the manufacturers (AMF) paint ? I have a 76 Sunfish that I am looking to paint the hull the original color.

Upside down?
Aftermarket paints will never match the original exactly because the paint on the hull has changed over time. But if you are going to paint the entire hull, that won't matter.
- Apr 8, 2020

Well-Known Member

It appears to be the original light blue that I have seen on others. It appears to be original after sanding a few spots. Ive seen threads on the brands, electorlux, rustoleum, wet edge etc. Asking if anyone on the forum can recommend the actual color. Ive looked online and have not seen where any of the manufacturers have tried to replicate Sunfish colors.

I do hull painting and gelcoat restorstion/repair for a living. There is no replacement gelcoat or paint color on the market, geared for the Sunfish as far as I know. Larger boats...cruisers, powerboats...typically yes. Small daysailor usually not. I agree, if there isn't too much damage, after aggresive compounding, a buff/wax can sometimes work. Colors....and also light blue, becomes more doubtful. The choice is then painting...from rattle cans to professional top coats....your color choice.
Lastly, EXACT color matching is a skill. That's why you'd re-paint an entire boat. You scratch a car door...the entire panel usually gets painted. Much easier then EXACT matching and feathering edges.
And.... if the gelcoat is not repairable....pick a color you think best matches, if you want the same color scheme. Various manufacturers make consumer paints around $40/qt...which can give 10 year+ incredible results...'interlux brightside' for example. A quart should be enough....follow manf. Instructuons. Others use a $4 Can of rustoleum, call it a day and go sailing.
Charles Howard
BillMc- Does the hull need repairing? Can you take pictures?

beldar boathead
Married to primat boathead.
The nice thing about gelcoat is it lasts. Yours is 44 years old and still going. Paint will scratch and add weight. But if you want to get closer to a new-boat look paint is the only way outside of respraying with gelcoat which is much more complex - and as with paint you won’t be able to buy gelcoat in the original color.
Charles Howard said: BillMc- Does the hull need repairing? Can you take pictures? Click to expand...
mixmkr said: I do hull painting and gelcoat restorstion/repair for a living. There is no replacement gelcoat or paint color on the market, geared for the Sunfish as far as I know. Larger boats...cruisers, powerboats...typically yes. Small daysailor usually not. I agree, if there isn't too much damage, after aggresive compounding, a buff/wax can sometimes work. Colors....and also light blue, becomes more doubtful. The choice is then painting...from rattle cans to professional top coats....your color choice. Click to expand...
Attachments

Just to clarify, the only paint on that hull is from repairs. Gelcoat is a 2-part resin mixture that provides a hard, shiny (when new), plastic-like surface. It’s much more durable than paint. The boats are made by spraying a polished female mold with gelcoat, then laying in the Fiberglass and resin. When the boat is popped from the mold it has a nice, shiny, durable finish.
you are correct, I mispoke. It looks like original gelcoat with some small repairs painted over in 3 or 4 small spots. Im not opposed to keeping it original then rubbing/waxing/buffing to bring the shine back out. I do need to make some repairs though. If you think by looking at the photos I should just buff it out, I would take your recommendation
BillMc said: There are a few areas that need minor repair - bow, halfway down the hull. I'll get some photos. thank you Click to expand...

Cactus Cowboy
- This site uses cookies to help personalise content, tailor your experience and to keep you logged in if you register. By continuing to use this site, you are consenting to our use of cookies. Accept Learn more…
Sailboat Bottom Paint: 10 Best Paints

Last Updated by
Daniel Wade
June 15, 2022
If you leave your boat without protection, it's beyond question that it will start attracting several marine organisms such as slime, algae, mussels, barnacle, and seaweed. This will cover the bottom of your sailboat and may negatively affect your boat's speed and fuel efficiency.
This is exactly why you need to apply the best sailboat bottom paint on your boat.
The freedom that sailing and being off land gives you are immense and almost unmatched.
But do you know that having multiple organisms such as algae, slime, barnacle, seaweed, and mussels grow on your boat can throw everything out on the wind and leave you with a very unreliable boat?
These pesky hangers will put a huge dent in your boat's speed, its movement, fuel efficiency, and overall aesthetic.
That's why you need the best sailboat bottom paint to greatly minimize any damage that might be caused to your boat's hull by marine biological growth.
Also known as antifouling paint, bottom paint is essentially a paint or coating that's specifically designed with elements that prevent various marine organisms such as algae, seaweed, barnacles, slime, and mussels from attaching themselves to your boat's hull or any other part of the boat that's below the waterline.
One of the most important elements of bottom paint is the inclusion of a biocide and copper is the most common. This may, however, depend on the type of boat that you have, how, and where you always use it.
But because there's an ocean of bottom paints out there on the market, choosing the best sailboat bottom paint can be an overwhelming task for most of us.
Fortunately, you can always count on us to make it a lot easier for you. We've gone through many bottom paints and we do not doubt that we've selected the most effective, reliable, and best sailboat bottom paint.
Our unbiased selections will not only match your needs and budget but will be available in a variety of colors to complement and augment your boat's visual appeal.
Table of contents
What to Consider when Purchasing Sailboat Bottom Paint
If you're on the market for the best sailboat bottom paint, it's crucial to go for top quality; something that will offer efficiency, top speed, and excellent performance for your sailboat. With that in mind, here are a few things to consider before spending your hard-earned money on bottom paint.
Your Sailing Location
Where are you planning to sail? Is it on a freshwater body or in a saltwater location? This is essential in helping you determine whether to go for a bottom paint that's meant for saltwater, freshwater, or both. It's generally recommended that you go for a bottom paint that will serve you perfectly well in both freshwater and saltwater. This gives you the versatility of sailing anywhere without worrying about marine organisms damaging your boat's hull.
Launch Time and Recoat Time
It's important to keep in mind that bottom paint products have specific launch time limits. The idea here is to ensure that you launch it within the required timeframe and ensure that recoating is done as required. You should, therefore, choose a bottom paint that offers a lengthy launch and recoat time while offering durable protection for your vessel is the right thing to do.
Type of Boat
You should determine whether your boat is made of wood, fiberglass, or aluminum and go for bottom paint that's suitable for that particular surface. Many bottom paints work perfectly with fiberglass but some work great with aluminum or wooden surfaces.
The Fouling Condition
Having a deeper idea of the type of fouling that you might deal with can be crucial when buying the right bottom paint for you. Whether you're dealing with slime, algae, mussel, or any other type of marine organism, knowing the type of fouling you're dealing with will make it a lot easier to pick the best sailboat bottom paint for your vessel.
Best Sailboat Bottom Paint
Rust-oleum marine flat boat bottom antifouling paint.
As one of the most respected brand names in the bottom paint industry, Rust-Oleum is known for producing some of the best sailboat bottom paint and the Marine Flat Boat Bottom Antifouling Paint is one of them. This bottom pain is designed to be suitable for various conditions (both freshwater and saltwater) and is designed with moderate copper that works great if you are environment-conscious.
This bottom paint does an excellent job of offering a protective coating to ensure that your boat is free of all sorts of unwanted marine organisms. You'll love this paint because it is thick and spreads so easily and will not be a problem even if you're a beginner. This bottom paint offers top-notch antifouling properties and is very easy to apply as long as you use a soft brush and mix it carefully. This is a great bottom paint choice that will offer a sleek multi-season finish and ensure that your boat's hull is always awesome and in great condition.
- Easy and simple to apply
- Great for both freshwater and saltwater
- Offers gentle fouling conditions
- Excellent in antifouling
- Offer a sleek and awesome finish
- Quite expensive
- Has a very strong smell that can cause headache
Interlux Fiberglass Bottomkote Antifouling Paint
This is another great brand that is considered as one of the best bottom paint in the sailing world. Even though it's a bit pricey, it offers great features that will ensure that your boat remains in tip-top shape. It is an excellent option if you're looking for a sailboat bottom paint that brings to the fore a unique dual resin approach.
This is a very reliable bottom paint that will not only prevent your boat's hull from the effect of marine organisms but also prevent premature deterioration. It offers an awesome polishing action and is perfecting if you want to discard unnecessary paint buildup. This bottom paint is also very economical and a small quantity will cover a considerable surface area of your boat's bottom.
This is, without a doubt, a superb buy in terms of its practicality and economical nature. It is excellently formulated to prevent marine organisms from damaging your boat and also to ensure that premature wear and tear doesn't exist in your vocabulary.
- It's formulated with a unique dual resin approach to prevent premature wear and tear
- It prevents early decline
- It prevents unnecessary paint buildup
- Great for ensuring that your boat is fuel effective
- Great for all conditions (both freshwater and saltwater)
- It's expensive
- The quantity and size can be misleading
TotalBoat JD Select Bottom Paint
As one of the few bottom paints that's formulated with low Volatile Organic Compounds (VOC), this bottom paint is one of the most cost-effective on this list. With one gallon, you can easily cover about 400 square feet and the application is a breeze since it's even much easier to clean up.
When you purchase this bottom paint, the package will come complete with a pair of latex gloves, a wooden stir stick, an abrasive pad, a metal tray kit, a paint suit, a roller, a painter's tape, and many more. The inclusion of all these accessories makes it a quite cost-effective purchase.
Again, this is one of the most durable bottom paints. Apply it on your boat's hull and you're guaranteed that it will offer excellent protection for the next 18 months. On the downside, this paint is too thick and you'll have to buy an excellent thinner for it to work perfectly.
Nonetheless, this is an ablative bottom paint that is easy to apply and does an excellent job of protecting your boat's bottom for close to two years.
- Perfect for all conditions
- Easy to apply and clean up
- Can improve your boat's speed and fuel efficiency
- Comes with all accessories required for the paint job
- It's one of the best water-based bottom paint products in the industry
- It contains low VOC
- You'll need a top-quality thinner for it to work perfectly
Aquaguard Water-based Antifouling Bottom Paint
An excellent choice for both wooden and fiberglass boats, this is the most perfect bottom point for saltwater conditions. This is a water-based bottom paint that's very easy to apply and clean up (using soap and water) and is formulated with an ablative action that makes it superb for preventing any marine organism that may negatively affect your boat.
This is a bottom paint that is EPA-approved and surpasses the set VOC standards. It has an extended shelf life and offers durable protection for your sailboat. It doesn't contain toxic fumes and is great even for novices. Its drying time is also excellent, so you won't wait for far too long to get your boat out there on the water.
- Excellent for saltwater conditions
- Application and cleaning is very easy
- It's approved by the US EPA
- You don't have to use a primer
- The color selection is limited
- A bit pricey
Pettit Hydrocoat
This is another water-based bottom paint that offers outstanding ablative properties that will protect your boat from marine organisms throughout the seasons. It offers good value for money and is easy to apply and clean up with just water and soap.
We're talking about a bottom paint product that will protect your boat's hull for months on end. You also do not need a full tank of the paint to complete the job. With just a single gallon, you can be sure to complete an area as big as 430 square feet.
This is also one of the few bottom paints that can perfectly prevent your boat from damage when being trailered, launched, or beached. More importantly, it's not irritating to the nose and eyes because it has low VOC.
- It will dry in 3 hours
- It's easy to apply and clean up
- It offers multi-season protection
- It's not irritating to the eyes and nose
- It's quite economical
- May not be the best in antifouling
- You have to apply at least two coats
SEA HAWK PAINTS Aluminum Boat Paint
One of the best aluminum boat paints in the market, this bottom paint is formulated to offer quick-dry corrosion-blocking, high-solid features. This bottom paint is specifically manufactured to be used in aluminum boats and doesn't require the addition of any primer.
While it doesn't have an antifouling feature, it stands out and can be used both below and above the waterline as it is risk-free and free or chromate. It is also formulated to offer a unique dual resin approach and can be used both as paint and a primer at the same time.
This is a great paint for both freshwater and saltwater conditions and can be applied as a primer or topcoat on a fiberglass boat. This is an excellent sailboat boat bottom paint that's worth every coin as it is practical, versatile, and can combat both rusting and lifting.
- The application and cleanup process is easy
- Great for both freshwater and saltwater conditions
- It doesn't require a primer
- Can be used as primer or topcoat in fiberglass boats
- Can prevent rusting and lifting
- It has quick-dry and anti-corrosion features
- Can produce deadly fumes
TotalBoat Spartan Boat Bottom Paint
If you've been looking for a practical, reliable, and cost-effecting bottom paint that will offer durable performance and protection, the Spartan Boat Bottom Paint. Perfect for both freshwater and saltwater, it can be perfect for protecting your boat and ensuring that it is fuel-efficient and reliable.
This bottom paint is formulated with advanced copolymer ablative to ensure that it doesn't deteriorate instantly. This is a very dependable bottom paint that will serve you perfectly throughout the year and will ensure that your boat easily defies fouling while reducing unnecessary buildup and sanding on your boat.
This is a very adaptable bottom paint that not only offers great value for money but is very easy to apply. More importantly, it is very durable and will protect your vessel for at least 12 months on any type of water.
- Great for all types of water
- It offers a very durable protection
- Available in a wide variety of color selection
- Offer a visually appealing abrasion-proof finish
- The included accessories aren't up to the right quality
To this end, we must put a lot of emphasis on the importance of having the right bottom paint for your boat. In addition to being an antifouling agent, bottom paint will significantly increase the fuel efficiency of your boat and ensure that it performs optimally at all times. Of course, you do not want to diminish your sailing escapades or have your nice and beautiful vessel damaged by marine organisms just because you didn't apply the right sailboat bottom paint. If you're unsure how to proceed, here's how to paint a sailboat.
Related Articles
I've personally had thousands of questions about sailing and sailboats over the years. As I learn and experience sailing, and the community, I share the answers that work and make sense to me, here on Life of Sailing.
by this author
Repairs and Maintenance
Sailboat Upgrades
Most Recent

What Does "Sailing By The Lee" Mean?
October 3, 2023

The Best Sailing Schools And Programs: Reviews & Ratings
September 26, 2023
Important Legal Info
Lifeofsailing.com is a participant in the Amazon Services LLC Associates Program, an affiliate advertising program designed to provide a means for sites to earn advertising fees by advertising and linking to Amazon. This site also participates in other affiliate programs and is compensated for referring traffic and business to these companies.
Similar Posts

How To Choose The Right Sailing Instructor
August 16, 2023

Cost To Sail Around The World
May 16, 2023

Small Sailboat Sizes: A Complete Guide
October 30, 2022
Popular Posts

Best Liveaboard Catamaran Sailboats
December 28, 2023

Can a Novice Sail Around the World?
Elizabeth O'Malley

4 Best Electric Outboard Motors

How Long Did It Take The Vikings To Sail To England?

10 Best Sailboat Brands (And Why)
December 20, 2023

7 Best Places To Liveaboard A Sailboat
Get the best sailing content.
Top Rated Posts
Lifeofsailing.com is a participant in the Amazon Services LLC Associates Program, an affiliate advertising program designed to provide a means for sites to earn advertising fees by advertising and linking to Amazon. This site also participates in other affiliate programs and is compensated for referring traffic and business to these companies. (866) 342-SAIL
© 2024 Life of Sailing Email: [email protected] Address: 11816 Inwood Rd #3024 Dallas, TX 75244 Disclaimer Privacy Policy
- Inspiration
- Tips & Resources

SIMILAR COLORS
Lighter colors, darker colors, coordinating colors.
Our recommended groupings of colors that pair well together.
Would you like to remove this product?
5 Gallon Bucket + 1 Gallon Can
Closes automatically in 10 seconds.
Our system is temporarily unavailable. Please try again later.

- INTERIOR PAINTS
- EXTERIOR PAINTS
ABOUT INTERIOR PAINTS
Behr makes highly rated, award-winning paints, stains, and more that deliver superior value at every price point so everyone can transform their space into the look they want with the colors they love.

BEHR PREMIUM PLUS ®
Paint & Primer ◊
GREENGUARD ® Gold Certified*
◊ A primer coat may be needed on some surfaces. See label for details.
**ZERO VOC: This product, like most Zero VOC paints, emits very low amounts of VOCs. Most emissions occur during painting and for 48 hours after. Some continue for two weeks or longer. While VOC emissions are very low, sensitive groups such as babies and asthma/allergy sufferers should minimize exposure.

BEHR ULTRA ® SCUFF DEFENSE ®
Stain-Blocking Paint & Primer ◊
Extra Durable Finish
◊ A primer coat may be needed on some surfaces. See back label copy for details.

BEHR MARQUEE ®
One-Coat Hide ◆
Exceptional Durability & Stain Resistance
◆ Valid only when tinted to colors from the BEHR DYNASTY™ & MARQUEE® Interior & Exterior One-Coat Hide Color Collection. Learn more.

BEHR DYNASTY ®
Advanced Stain Repellency
*GREENGUARD Certified products are certified to GREENGUARD standards for low chemical emissions into indoor air during product usage. For more information, visit ul.com/gg.
ABOUT EXTERIOR PAINTS
Behr manufactures highly rated paints, primers and stains that offer premium quality at a range of price points. Each exterior product is available in a spectrum of colors to help you transform the look of your home.

Mildew Resistance Finish
GREENGUARD® Gold Certified*

BEHR ULTRA ®
All-Weather Protection

Exceptional Fade & Dirt Resistance

10-Year Color Fade Protection**
Quick Return To Service (Doors/Trim/Window)
**Valid only when tinted to colors from the BEHR DYNASTY® specially curated Exterior Color Fade Protection Palette. Based on predictive lab testing with a color shift less than Delta E of 5 as measured by CieLAB. A primer coat may be needed. Two coats of BEHR DYNASTY® Exterior Paint are recommended for optimal durability. Individual results may vary. See back label instructions for details and warranty limitations.
- INTERIOR PAINT
- EXTERIOR PAINT
- FLOOR COATINGS
* Important Disclaimer: Coverage calculator results are to be used only as estimates. Behr Process LLC cannot guarantee that you will achieve proper results without verifying your measurements and assumptions.
Send Calculation by Email
Email calculation results to your family and friends.
- INTERIOR SHEENS
- EXTERIOR SHEENS
About Interior Paint Sheens
Get the look you want and the protection you need for any room in your home.
A flat sheen has a non-reflective finish that touches up well and hides minor surface imperfections.
Low-traffic areas; interior walls and ceilings
A matte sheen has a low-luster, reflective finish that is durable, easy to clean, touches up well and also hides minor surface imperfections.
Low-traffic areas; interior walls
Family rooms, living rooms, kids' rooms, bathrooms, dining rooms, ceilings
An eggshell enamel sheen has a soft, velvety appearance that resists dirt and grime, as well as mildew.
Moderate-traffic areas
Family rooms, living rooms, bedrooms, kids' rooms, hallways, dining rooms
A satin enamel sheen has a pearl-like finish that's easy to clean.
All interior surfaces; moderate- to high-traffic areas
Family rooms, living rooms, bedrooms, kids' rooms, hallways, kitchens, bathrooms, doors, windows, trim, cabinets, shutters, interior furniture
Medium-High
A semi-gloss enamel sheen is sleek and radiant resisting mildew, moisture and wear.
Cabinets and trim; high-traffic, high-moisture areas
Kids' rooms, hallways, kitchens, bathrooms, doors, windows, trim, cabinets, shutters
Hi-Gloss enamel sheens provide have a brilliant, shiny appearance and a durable, glass-like finish that allows dirt and grime to be wiped clean.
High-use surfaces
Kitchens, bathrooms, doors, windows, trim, cabinets, shutters, interior furniture
About Exterior Paint Sheens
Set the right curb appeal with exterior painting efforts that last.
A flat sheen is non-reflective, and easy to apply and touch up. It will minimize the appearance of minor surface imperfections.
Wood and vinyl walls and siding; brick and other masonry; fences
A satin enamel sheen creates a pearl-like finish that's durable and dirt-resistant. It will also resist moisture, fading and stains.
Virtually all exterior surfaces
A semi-gloss enamel sheen is sleek and radiant with a hard, durable finish. It is formulated to withstand wear, and will also resist moisture, fading and stains.
Doors, trim and shutters; Exterior furniture
Hi-Gloss enamel sheen have a brilliant, shiny appearance and a durable, glass-like finish that allows dirt and grime to be wiped clean.
Send Page by Email
Email this page to your family and friends., forgot password.
Please enter your email address. If it is on file, please check your inbox for an email with a link to update your password.

MY PROJECTS
Sign up for a Behr Project account and be able to:
Save your room images, painted in colors you choose.
Keep track of your painting projects.
Know which colors you used in each room.
Fields in bold with an asterisk (*) are required. See our privacy policy.
Yes, please send me BEHR® news and special offers via email. Privacy Policy.
Remember Me
Would you like to remove this project from your saved projects?
Signed in as Log Out
Never miss out on the latest news from BEHR. By creating an account that includes your personal information, you are agreeing to our Privacy Policy .
Never miss out on the best Behr promotions, products and inspiration.
Fields with an asterisk (*) are required. See our privacy policy
(optional) By entering your mobile number, clicking submit and completing the sign-up instructions, you consent to receive one or more recurring marketing SMS messages from Behr news and promo updates, and you consent to the terms contained in the SMS/Text Message Terms of Use and Privacy Policy . Consent is not a condition of any purchase. Text STOP to 27586 end. Reply HELP to 27586 for help. Message Frequency may vary. Message & Data Rates May Apply.
IMAGES
COMMENTS
Hello my creative friends! In this acrylic painting tutorial we will go step by step to learn how to paint a sailboat in the ocean. Thank you to my awesome p...
Hello my creative friends! In this acrylic painting tutorial we will go step by step to learn how to paint a sailboat with a sunset over the ocean. Thank you...
This video shows how to paint a sailing boat in watercolor. It´s simple and easy, for beginners. Get my drawing book: http://amzn.to/1K7L8EdFollow my Instagr...
01:06 - Painting the sail boat. 02:16 - Painting waves. 03:01 - Painting trees and background. 04:53 - Painting the sky. 06:14 - My thoughts on the painting. ... learn fundamental techniques and tips including color theory and composition, and walk away feeling super confident with your new love of watercolor!
Whether you have a sailboat, powerboat, or kayak, the principles of boat painting remain largely the same. Assessing your boat's condition. Before you begin, evaluate your boat's current condition. Inspect the hull for any damage, scratches, or rust that may need to be addressed before painting. Make a list of necessary repairs and tackle them ...
Since I didn't have a sailboat there, I sketched and took photos of the sailboats moving up and down the Sound. The shimmering water is the tricky part of this painting. It's a great opportunity to practice your dry brush! This painting needs rough press paper to get that sparkling water. The rest of the painting is simple.
Watercolor Boat Painting - Finally we Paint! Paint the cabins in the lightest value. Continue with the light colors. More light colors. So let's start painting. We're going to paint this in layers and build up the painting from light to dark. We're first going to block in all the shapes with their lightest colors.
After you have finished with the 600 grit sandpaper, it is time to move on to 800, then 1200. This process is important so you will be painting on as smooth a surface as possible. It is then a good idea to wipe the surfaces of the boat down with a damp cloth to remove any of the dust and flakes of metal/wood.
Then Janet used a solvent wash to ensure a strong bond with the primer paint. 3. After dings and cracks were repaired and sanded, two coats of epoxy primer were applied. 4. Following another round of sanding, vacuuming, cleaning, and taping, the couple rolled and brushed on a fresh coat of Awlgrip topcoat. 5.
Step 7: Details On A Watercolor Sailboat. Dilute some Neutral Tint with a no. 8 round brush, then paint the sailboat's shadows and details. Drop in a little of the green mixture near the bottom to show how it reflects the water's color, then mix Burnt Sienna and Indigo for a dark brown to paint the cabin door.
Los Angeles-based watercolor artist Maria Raczynska demonstrates how to paint a beautiful birds-eye ocean scene with a sailboat in this video tutorial! Go back. Princeton Artist Brush Company. Neenah, WI 54956.
Hey guys here is a super Fun and EASY watercolor tutorial for you to try abstract sailboats!! I go over this step by step- lots of fun with wet on wet techni...
Apply the filler or fairing compound with a putty knife, smoothing it out to create a level surface. Once the filler has cured, sand it lightly to ensure it blends seamlessly with the rest of the surface. By cleaning the boat's surface and removing loose or flaking paint, you create a clean canvas for the new paint.
Application. Sand the undercoat smooth with 180-280 grit paper and remove dust with a wipe or tack rag. Apply 1-2 coats of Bilgekote. For added protection against moisture absorption and osmosis in bilge areas, use Interprotect 2000E - prior to applying Bilgekote - always follow the label instructions.
The only disappointment was the streaky nature of its medium-gray enamel. Even after re-stirring, it required three coats to develop a smooth hue. The difference highlights the fact that even though one manufacturer makes multiple colors of paint, one color may not have the same gloss or application qualities as another color.
Fortunately there are still some sailboats sailing the high seas. It is certainly a grand sight when a tall ship sails into a modern harbour. The sight conjours up the imagination of pirates and gun ships in battle. In this lesson you will learn: 1. How to paint a stormy sky to offset the light coloured sails 2.
Only two colors are acceptable for painting a boat: white and black. And only a fool would paint one black. At least that's what Nathanael Greene Herreshoff believed. Herreshoff, the "Wizard of Bristol," was a naval architect, marine engineer, inventor and shipbuilder, and perhaps the greatest yacht designer of the late 19th and early ...
This tutorial will show you how to paint a simple loose watercolor sail boat. This easy painting takes under 10 minutes, but includes fun techniques to inspi...
Gelcoat is a 2-part resin mixture that provides a hard, shiny (when new), plastic-like surface. It's much more durable than paint. The boats are made by spraying a polished female mold with gelcoat, then laying in the Fiberglass and resin. When the boat is popped from the mold it has a nice, shiny, durable finish.
Rust-Oleum Marine Flat Boat Bottom Antifouling Paint. As one of the most respected brand names in the bottom paint industry, Rust-Oleum is known for producing some of the best sailboat bottom paint and the Marine Flat Boat Bottom Antifouling Paint is one of them. This bottom pain is designed to be suitable for various conditions (both ...
Beginners Drawing Course: http://bit.ly/2Gn4rOIDrawYTMy Art and Creativity PODCAST:https://goo.gl/uGLjdkInstagram: https://www.instagram.com/lironyanil/My bo...
SAILBOAT is one of over 3,000 colors you can find, coordinate, and preview on www.behr.com. Start your project with SAILBOAT now. RGB: #314A72. ... LEARN ABOUT PAINT COLORS. Learn About Paint Colors. Simply select your favorite boards, then your favorite images (up to six) and Pins to Palettes will create a custom color palette based on your ...
This video will take you through all the stages in painting a small fishing boat in watercolour, tutored by professional artist Paul Clark.Link to video on '...